前端实用技巧合集
实现新手指引
仿照 driver.js 实现 新手指引的功能
实现思路是:
- 点击“开始指引”:找到id为mask的元素,为该元素添加蒙层样式(setMask)
- 添加提示信息:找到id为tip的元素,将提示信息添加为该元素的子元素(setTip)
- 高亮当前步骤元素:找到当前目标元素,克隆目标元素,然后将克隆后的目标元素添加为curStepMask的子元素(setTip)
- 定位tip和curStepMask的元素:curStepMask元素在当前目标元素的正上方,tip元素根据情况而定
- 每次添加当前提示信息时要移除上一次添加的提示信息和覆盖元素(removeTip,removeStepMask)
html
<!DOCTYPE html>
<html lang="en">

<head>
    <meta charset="UTF-8">
    <meta http-equiv="X-UA-Compatible" content="IE=edge">
    <meta name="viewport" content="width=device-width, initial-scale=1.0">
    <title>新手指引功能</title>
    <style>
        * {
            margin: 0;
            padding: 0;
        }

        body {
            box-sizing: border-box;
        }

        .stepBlock {
            background-color: burlywood;
            margin-right: 20px;
        }

        .positionStyle {
            position: absolute;
            z-index: 200;
        }

        .overlay {
            position: fixed;
            top: 0;
            left: 0;
            right: 0;
            bottom: 0;
            background-color: rgba(0, 0, 0, .5);
            z-index: 100;
        }
    </style>
</head>

<body>
<section id="mask">
    <!-- 存储提示语 -->
    <section class="positionStyle" id="tip"></section>
    <!-- 存储 高亮的第一步、第二步、第三步-->
    <section class="positionStyle" id="curStepMask"></section>
</section>

<section style="margin:200px;">
    <span id="first" class="stepBlock">第一步</span>
    <span id="second" class="stepBlock">第二步</span>
    <span id="third" class="stepBlock">第三步</span>
</section>

<section style="margin-top:30px">
    <button onclick="setMask()">开始指引</button>
</section>

<script>
  const tipDict = [
    {id: 'first', content: '这里是第1步哦'},
    {id: 'second', content: '这里是第2步哦'},
    {id: 'third', content: '这里是最后一步哦,点击完成按钮结束新手指引'},
  ]
  let flag = 0;

  // 添加蒙层
  function setMask() {
    let mask = document.getElementById('mask')
    mask.setAttribute('class', 'overlay')
    setTip()
  }

  // 移除蒙层
  function removeMask() {
    let mask = document.getElementById('mask')
    mask.setAttribute('class', '')

    // 移除tip提示的子元素
    removeTip()
    removeStepMask()
  }

  function setTip() {
    if (flag < tipDict.length) {
      // 获取当前步骤的元素,以及元素的位置信息,供后续定位提示信息和覆盖信息使用
      const curStepEle = document.getElementById(tipDict[flag].id)
      const bound = curStepEle.getBoundingClientRect()

      // 找到 id 为 tip 的元素
      let ele = document.getElementById("tip")

      // 如果存在子元素,先移除
      removeTip()
      removeStepMask()

      // 创建提示信息和下一步的统一父元素,方便后续移除元素
      let node = document.createElement('div')
      // 创建提示信息
      let tipText = document.createTextNode(tipDict[flag].content)
      // 将提示信息插入到父元素
      node.appendChild(tipText)
      // 创建“下一步”按钮
      let nextBtn = document.createElement('button')
      nextBtn.innerHTML = flag === tipDict.length - 1 ? '完成' : '下一步';
      nextBtn.onclick = setTip;
      // 将按钮插入到父元素
      node.appendChild(nextBtn)
      // 设置统一父元素的位置


      ele.style.left = bound.x + 'px'
      ele.style.top = bound.y + 20 + 'px'
      // 将创建的提示语元素插入到id为tip的元素
      ele.appendChild(node)

      // 将当前步骤高亮显示
      let tag = flag - 1
      if (tag >= 0) {
        document.getElementById(tipDict[tag].id).style = ''
      }
      // const curStepEle = document.getElementById(tipDict[flag].id)
      // const bound = curStepEle.getBoundingClientRect()

      const curStepMask = document.getElementById('curStepMask')
      curStepMask.style.left = bound.x + 'px'
      curStepMask.style.top = bound.y + 'px'

      const curStepEleClone = curStepEle.cloneNode(true)
      curStepMask.appendChild(curStepEleClone)

      flag++
    } else {
      flag = 0;
      removeMask()
    }
  }

  function removeStepMask() {
    let ele = document.getElementById('curStepMask')
    let child = ele.lastElementChild
    if (child) {
      ele.removeChild(child)
    }
  }

  function removeTip() {
    let ele = document.getElementById("tip")
    let child = ele.lastElementChild
    if (child) {
      ele.removeChild(child)
    }
  }
</script>
</body>

</html>
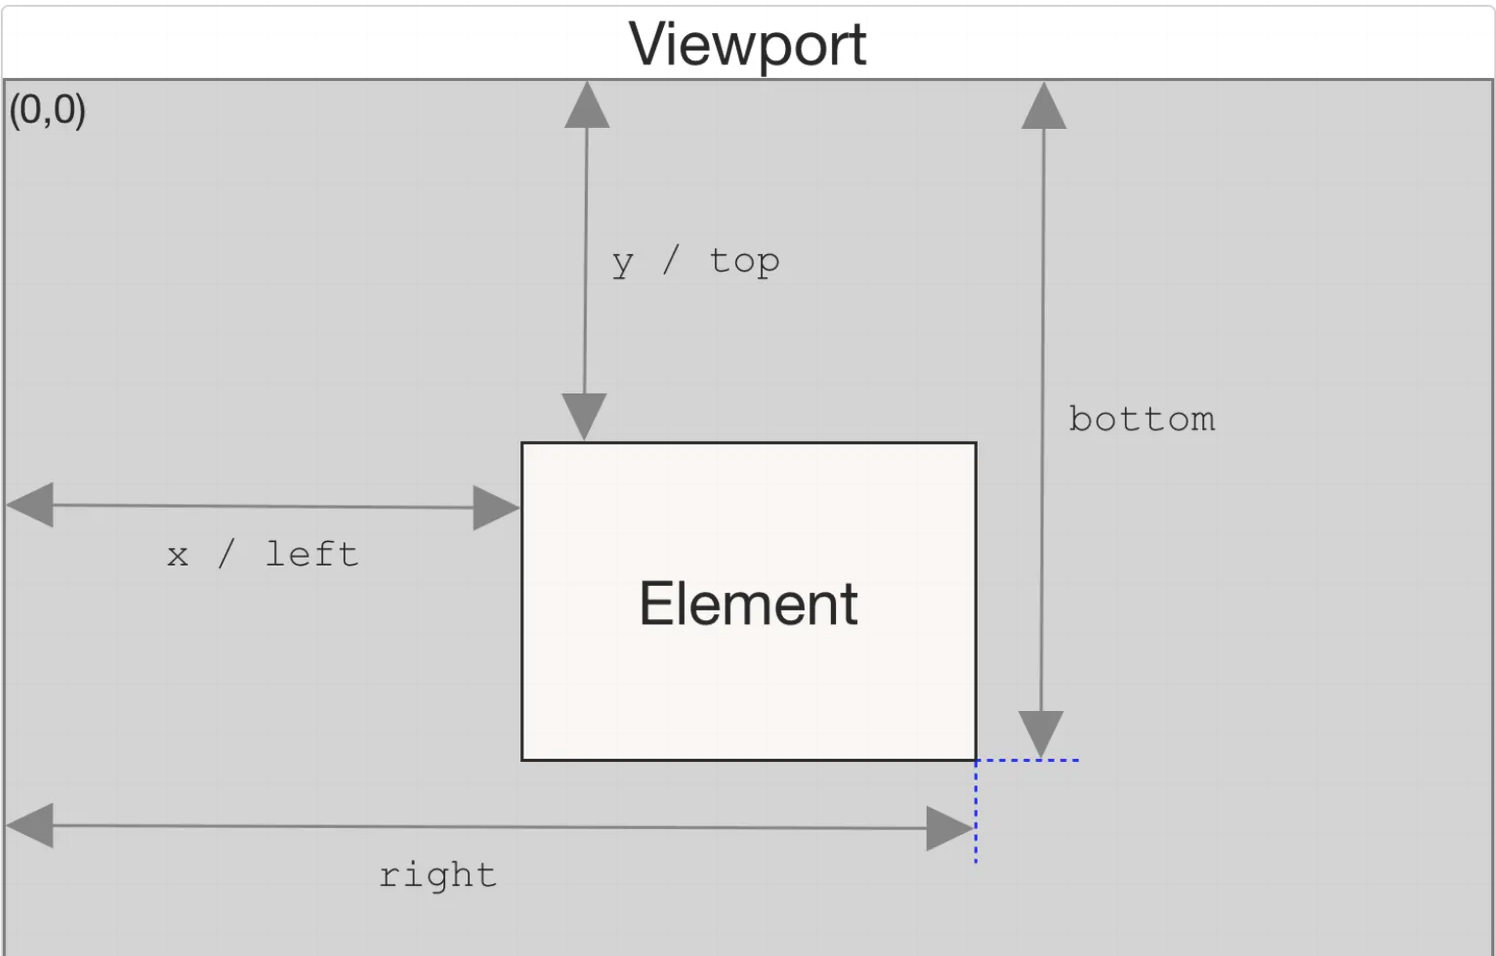
getBoundingClientRect
返回值是一个
DOMRect对象,是包含整个元素的最小矩形(包括padding和border-width)。该对象使用left、top、right、bottom、x、y、width和height这几个以像素为单位的只读属性描述整个矩形的位置和大小。除了width和height以外的属性是相对于视图窗口的左上角来计算的。 --MDN
场景题:一个公告栏,每天都可以展示,当用户点击关闭后,过了今天零点还会显示
在 localStorage 中存储用户关闭公告栏的时间戳,等再次进入页面的时候判断是不是存在 localStorage:
- 若不存在则证明从来没有关闭过公告栏,那就显示;
- 若存在,就判断时间戳和当前时间是否是同一天,不是同一天就显示
js
function getTime(data, type){  //data 时间戳,type 返回的类型默认 Y,可传参 Y 和 H
  let time = new Date(data);
  let Y = time.getFullYear();//获得年
  let Mon = time.getMonth() + 1; //月
  let Day = time.getDate();//日
  let H = time.getHours();
  let Min = time.getMinutes();
  let S = time.getSeconds();
  //自定义选择想要返回的类型
  if(type === "Y") {   //返回年月日2020-10-10
    return `${Y}-${Mon}-${Day}`
  } else if(type === "H") {  //返回时分秒20:10:10
    return `${H}:${Min}:${S}`
  } else {  //返回年月日时分秒2020-10-10 10:26:38
    return `${Y}-${Mon}-${Day} ${H}:${Min}:${S}`
  }
}
命名方式中划线与驼峰转换
命名方式中划线改小驼峰
js
function transName(arr) {
    let res = arr.map(e => {
        let items = e.split('-').map((item, index) => {
            if (index) {
                let first = item.substring(0,1)
                let rest = item.substring(1)
                return first.toUpperCase()+rest
            }else{
                return item.toLowerCase()
            }
        })
        return items.join('')
    })
    return res
}
console.log(transName(['A-b-cee', 'ca-de-ea', 'e-fe-eaa','f-g','mn']))
// ['aBCee', 'caDeEa', 'eFeEaa', 'fG', 'mn']
js
function turnName(str){
    return str.replace(/-[a-zA-Z]/g,match=>match.replace('-','').toUpperCase())
}
命名方式小驼峰改中划线
js
let s1 = 'aBBcdE';

let t = s1.replace( /[A-Z]/g, match=>'-'+match.toLowerCase());
console.log(t);
前端的缓存机制
分为强缓存和协商缓存
强缓存不需要客户端向服务端发送请求,有两种响应头实现方案:
- Expires:值是一个绝对时间,在这个时间前缓存有效,但是如果本地时间被修改,会导致缓存失效
- Cache-control:值是一个相对时间,单位为秒,资源在这个时间内有效
强缓存过期之后会使用协商缓存,协商缓存需要客户端向服务端发送请求,资源未过期则服务端返回 304,否则返回新的资源。协商缓存也有两种实现方案:
- Last-Modified 和 If-Modified-Since:
Last-Modified表示本地文件最后修改日期,If-Modified-Since会将Last-Modified的值发送给服务器,询问服务器在该日期后资源是否有更新,有更新的话就会将新的资源发送回来。但是如果本地文件被打开,会导致Last-Modified被修改。 - ETag 和 If-None-Match:
ETag类似于文件指纹,If-None-Match会将当前ETag发送给服务器,询问该资源ETag是否变动,有变动的话就将新的资源发送回来。并且ETag优先级比Last-Modified高
判断图片即将进入可视区域
方案1:clientHeight + scrollTop > offsetTop
html
<!DOCTYPE html>
<html lang="en">

  <head>
    <meta charset="UTF-8">
    <meta http-equiv="X-UA-Compatible" content="IE=edge">
    <meta name="viewport" content="width=device-width, initial-scale=1.0">
    <title>图片加载优化</title>
  </head>

  <body>
    <div style="background-color: green;width:100vw;height:8000px">
    </div>
    <div id="yellow" style="background-color: yellow;width:100vw;height:800px">
    </div>

    <script>
      document.addEventListener('scroll', () => {
        // 获取屏幕可视区域的高度
        const clientH = document.documentElement.clientHeight
        // 获取浏览器窗口顶部与文档顶部之间的距离,也就是滚动条滚动的距离
        const scrollT = document.documentElement.scrollTop
        // 获取元素相对于文档顶部的高度
        const offsetTop = document.getElementById('yellow').offsetTop

        if (clientH + scrollT > offsetTop) {
          console.log('进入可视区域啦!!')
        }
      })
    </script>
  </body>

</html>
方案2:下滑过程中 bound.top 会越来越小
html
<!DOCTYPE html>
<html lang="en">

<head>
    <meta charset="UTF-8">
    <meta http-equiv="X-UA-Compatible" content="IE=edge">
    <meta name="viewport" content="width=device-width, initial-scale=1.0">
    <title>图片加载优化</title>
</head>

<body>
    <div style="background-color: green;width:100vw;height:8000px">
    </div>
    <div id="yellow" style="background-color: yellow;width:100vw;height:800px">
    </div>

    <script>
        document.addEventListener('scroll', () => {
            var bound = document.getElementById('yellow').getBoundingClientRect(); // 获取元素的大小及位置
            var clientHeight = window.innerHeight;
            if (bound.top <= clientHeight) {
                console.log('进入可视区域啦')
            }
        })
    </script>
</body>

</html>