手写 Vite
系统学习了 Vite 的实现源码,从配置解析、依赖预构建、插件流水线和 HMR 这几个方面带你完整的梳理了 Vite 的底层原理。用实际的代码来写一个迷你版的 Vite,主要实现 Vite 最核心的 no-bundle 构建服务
实战概览
梳理一下需要完成的模块和功能,让大家有一个整体的认知:
-
首先会进行开发环境的搭建,安装必要的依赖,并搭建项目的构建脚本,同时完成 cli 工具的初始化代码
-
然后正式开始实现
依赖预构建的功能,通过 Esbuild 实现依赖扫描和依赖构建的功能 -
接着开始搭建 Vite 的插件机制,也就是开发
PluginContainer和PluginContext两个主要的对象 -
搭建完插件机制之后,将会开发一系列的插件来实现 no-bundle 服务的编译构建能力,包括入口 HTML 处理、 TS/TSX/JS/TSX 编译、CSS 编译和静态资源处理
-
最后会实现一套系统化的模块热更新的能力,从搭建模块依赖图开始,逐步实现 HMR 服务端和客户端的开发。
搭建开发环境
执行 pnpm init -y 来初始化项目,然后安装一些必要的依赖执行命令如下:
// 运行时依赖
pnpm i cac chokidar connect debug es-module-lexer esbuild fs-extra magic-string picocolors resolve rollup sirv ws -S

// 开发环境依赖
pnpm i @types/connect @types/debug @types/fs-extra @types/resolve @types/ws tsup
Vite 本身使用的是 Rollup 进行自身的打包,但之前介绍的 tsup 也能够实现库打包的功能,并且内置 esbuild 进行提速,性能上更加强悍,因此在这里我们使用 tsup 进行项目的构建。
为了接入 tsup 打包功能,你需要在 package.json 中加入这些命令:
"scripts": {
  "start": "tsup --watch",
  "build": "tsup --minify"
},
同时,你需要在项目根目录新建 tsconfig.json 和 tsup.config.ts 这两份配置文件,内容分别如下:
// tsconfig.json
{
  "compilerOptions": {
    // 支持 commonjs 模块的 default import,如 import path from 'path'
    // 否则只能通过 import * as path from 'path' 进行导入
    "esModuleInterop": true,
    "target": "ES2020",
    "moduleResolution": "node",
    "module": "ES2020",
    "strict": true
  }
}// tsup.config.ts
import { defineConfig } from "tsup";
export default defineConfig({
// 后续会增加 entry
entry: {
index: "src/node/cli.ts",
},
// 产物格式,包含 esm 和 cjs 格式
format: ["esm", "cjs"],
// 目标语法
target: "es2020",
// 生成 sourcemap
sourcemap: true,
// 没有拆包的需求,关闭拆包能力
splitting: false,
});接着新建 src/node/cli.ts文件,我们进行 cli 的初始化:
// src/node/cli.ts
import cac from "cac";

const cli = cac();

// [] 中的内容为可选参数,也就是说仅输入 `vite` 命令下会执行下面的逻辑
cli
  .command("[root]", "Run the development server")
  .alias("serve")
  .alias("dev")
  .action(async () => {
    console.log('测试 cli~');
  });

cli.help();

cli.parse();
执行 pnpm start 来编译这个mini-vite项目,tsup 会生成产物目录 dist,然后你可以新建 bin/mini-vite 文件来引用产物:
#!/usr/bin/env node

require("../dist/index.js");
同时需要在 package.json 中注册 mini-vite 命令,配置如下:
{
  "bin": {
    "mini-vite": "bin/mini-vite"
  }
}
如此一来就可以在业务项目中使用 mini-vite 这个命令了。准备了一个示例的 playground 项目,你可以拿来进行测试,将 playground 项目放在 mini-vite 目录中,然后执行 pnpm i,由于项目的 dependencies 中已经声明了mini-vite:
{
  "devDependencies": {
    "mini-vite": '../'
  }
}
那么 mini-vite 命令会自动安装到测试项目的node_modules/.bin目录中:
接着在 playground 项目中执行 pnpm dev 命令(内部执行 mini-vite ),可以看到如下的 log 信息: 测试 cli~
接着把 console.log 语句换成服务启动的逻辑:
import cac from "cac";
import { startDevServer } from "./server";

const cli = cac();

cli
  .command("[root]", "Run the development server")
  .alias("serve")
  .alias("dev")
  .action(async () => {
  console.log('测试 cli~');
  await startDevServer();
});
现在需要新建 src/node/server/index.ts,内容如下:
// connect 是一个具有中间件机制的轻量级 Node.js 框架。
// 既可以单独作为服务器,也可以接入到任何具有中间件机制的框架中,如 Koa、Express
import connect from "connect";

// picocolors 是一个用来在命令行显示不同颜色文本的工具
import { blue, green } from "picocolors";

export async function startDevServer() {
  const app = connect();
  const root = process.cwd();
  const startTime = Date.now();
  app.listen(3000, async () => {
    console.log(
      green("🚀 No-Bundle 服务已经成功启动!"),
      `耗时: ${Date.now() - startTime}ms`
    );
    console.log(`> 本地访问路径: ${blue("http://localhost:3000")}`);
  });
}再次执行pnpm dev,可以发现终端出现启动日志,mini-vite 的 cli 功能和服务启动的逻辑目前就已经成功搭建起来了
依赖预构建
现在来进入依赖预构建阶段的开发。首先新建 src/node/optimizer/index.ts 来存放依赖预构建的逻辑:
export async function optimize(root: string) {
  // 1. 确定入口
  // 2. 从入口处扫描依赖
  // 3. 预构建依赖
}
然后在服务入口中引入预构建的逻辑:
// src/node/server/index.ts
import connect from "connect";
import { blue, green } from "picocolors";
+ import { optimize } from "../optimizer/index";

export async function startDevServer() {
  const app = connect();
  const root = process.cwd();
  const startTime = Date.now();
  app.listen(3000, async () => {
+   await optimize(root);

    console.log(
      green("🚀 No-Bundle 服务已经成功启动!"),
      `耗时: ${Date.now() - startTime}ms`
    );
    console.log(`> 本地访问路径: ${blue("http://localhost:3000")}`);
  });
}
接着来开发依赖预构建的功能,从上面的代码注释你也可以看出,需要完成三部分的逻辑:
- 确定预构建入口
- 从入口开始扫描出用到的依赖
- 对依赖进行预构建
首先是确定入口,为了方便理解直接约定为 src 目录下的 main.tsx 文件:
// 需要引入的依赖
import path from "path";

// 1. 确定入口
const entry = path.resolve(root, "src/main.tsx");
第二步是扫描依赖:
// 需要引入的依赖
import { build } from "esbuild";
import { green } from "picocolors";
import { scanPlugin } from "./scanPlugin";

// 2. 从入口处扫描依赖
const deps = new Set<string>();
await build({
  entryPoints: [entry],
  bundle: true,
  write: false,
  plugins: [scanPlugin(deps)],
});
console.log(
  `${green("需要预构建的依赖")}:\n${[...deps]
  .map(green)
  .map((item) => `  ${item}`)
  .join("\n")}`
);
依赖扫描需要借助 Esbuild 插件来完成,最后会记录到 deps 这个集合中。接下来来着眼于 Esbuild 依赖扫描插件的开发,你需要在optimzier 目录中新建 scanPlguin.ts 文件,内容如下:
// src/node/optimizer/scanPlugin.ts
import { Plugin } from "esbuild";
import { BARE_IMPORT_RE, EXTERNAL_TYPES } from "../constants";

export function scanPlugin(deps: Set<string>): Plugin {
  return {
    name: "esbuild:scan-deps",
    setup(build) {
      // 忽略的文件类型
      build.onResolve(
        { filter: new RegExp(`\\.(${EXTERNAL_TYPES.join("|")})$`) },
        (resolveInfo) => {
          return {
            path: resolveInfo.path,
            external: true,  // 打上 external 标记
          };
        }
      );
      // 记录依赖
      build.onResolve(
        {
          filter: BARE_IMPORT_RE,
        },
        (resolveInfo) => {
          const { path: id } = resolveInfo;
          // 推入 deps 集合中
          deps.add(id);
          return {
            path: id,
            external: true,
          };
        }
      );
    },
  };
}
需要说明的是,文件中用到了一些常量,在 src/node/constants.ts 中定义,内容如下:
export const EXTERNAL_TYPES = [
  "css",
  "less",
  "sass",
  "scss",
  "styl",
  "stylus",
  "pcss",
  "postcss",
  "vue",
  "svelte",
  "marko",
  "astro",
  "png",
  "jpe?g",
  "gif",
  "svg",
  "ico",
  "webp",
  "avif",
];

export const BARE_IMPORT_RE = /^[\w@][^:]/;
插件的逻辑非常简单,即把一些无关的资源进行 external,不让 esbuild 处理,防止 Esbuild 报错,同时将 bare import的路径视作第三方包,推入 deps 集合中。
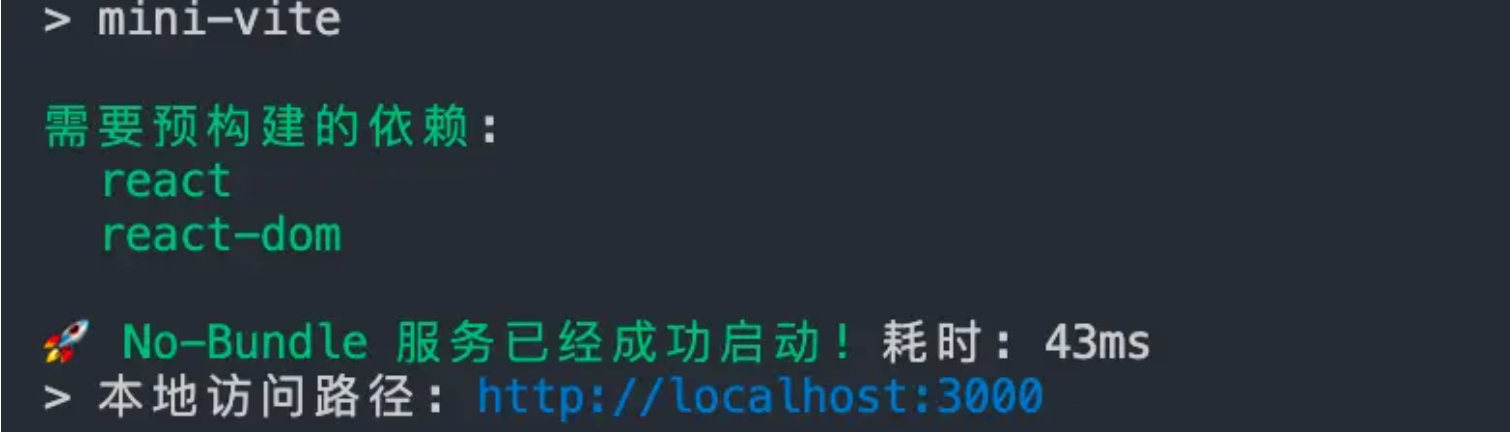
现在在 playground 项目根路径中执行 pnpm dev,可以发现依赖扫描已经成功执行:\
当收集到所有的依赖信息之后,就可以对每个依赖进行打包,完成依赖预构建了:
// src/node/optimizer/index.ts
// 需要引入的依赖
import { preBundlePlugin } from "./preBundlePlugin";
import { PRE_BUNDLE_DIR } from "../constants";

// 3. 预构建依赖
await build({
  entryPoints: [...deps],
  write: true,
  bundle: true,
  format: "esm",
  splitting: true,
  outdir: path.resolve(root, PRE_BUNDLE_DIR),
  plugins: [preBundlePlugin(deps)],
});
在此,我们引入了一个新的常量 PRE_BUNDLE_DIR,定义如下:
// src/node/constants.ts
// 增加如下代码
import path from "path";

// 预构建产物默认存放在 node_modules 中的 .m-vite 目录中
export const PRE_BUNDLE_DIR = path.join("node_modules", ".m-vite");
接着,我们继续开发预构建的 Esbuild 插件。首先,考虑到兼容 Windows 系统,我们先加入一段工具函数的代码:
// src/node/utils.ts
import os from "os";

export function slash(p: string): string {
  return p.replace(/\\/g, "/");
}

export const isWindows = os.platform() === "win32";


export function normalizePath(id: string): string {
  return path.posix.normalize(isWindows ? slash(id) : id);
}
然后完善预构建的代码:
import { Loader, Plugin } from "esbuild";
import { BARE_IMPORT_RE } from "../constants";
// 用来分析 es 模块 import/export 语句的库
import { init, parse } from "es-module-lexer";
import path from "path";
// 一个实现了 node 路径解析算法的库
import resolve from "resolve";
// 一个更加好用的文件操作库
import fs from "fs-extra";
// 用来开发打印 debug 日志的库
import createDebug from "debug";
import { normalizePath } from "../utils";

const debug = createDebug("dev");

export function preBundlePlugin(deps: Set<string>): Plugin {
  return {
    name: "esbuild:pre-bundle",
    setup(build) {
      build.onResolve(
        {
          filter: BARE_IMPORT_RE,
        },
        (resolveInfo) => {
          const { path: id, importer } = resolveInfo;
          const isEntry = !importer;
          // 命中需要预编译的依赖
          if (deps.has(id)) {
            // 若为入口,则标记 dep 的 namespace
            return isEntry
              ? {
                  path: id,
                  namespace: "dep",
                }
              : {
                  // 因为走到 onResolve 了,所以这里的 path 就是绝对路径了
                  path: resolve.sync(id, { basedir: process.cwd() }),
                };
          }
        }
      );

      // 拿到标记后的依赖,构造代理模块,交给 esbuild 打包
      build.onLoad(
        {
          filter: /.*/,
          namespace: "dep",
        },
        async (loadInfo) => {
          await init;
          const id = loadInfo.path;
          const root = process.cwd();
          const entryPath = normalizePath(resolve.sync(id, { basedir: root }));
          const code = await fs.readFile(entryPath, "utf-8");
          const [imports, exports] = await parse(code);
          let proxyModule = [];
          // cjs
          if (!imports.length && !exports.length) {
            // 构造代理模块
            // 下面的代码后面会解释
            const res = require(entryPath);
            const specifiers = Object.keys(res);
            proxyModule.push(
              `export { ${specifiers.join(",")} } from "${entryPath}"`,
              `export default require("${entryPath}")`
            );
          } else {
            // esm 格式比较好处理,export * 或者 export default 即可
            if (exports.includes("default")) {
              proxyModule.push(`import d from "${entryPath}";export default d`);
            }
            proxyModule.push(`export * from "${entryPath}"`);
          }
          debug("代理模块内容: %o", proxyModule.join("\n"));
          const loader = path.extname(entryPath).slice(1);
          return {
            loader: loader as Loader,
            contents: proxyModule.join("\n"),
            resolveDir: root,
          };
        }
      );
    },
  };
}
值得一提的是,对于 CommonJS 格式的依赖,单纯用 export default require('入口路径') 是有局限性的,比如对于 React 而言,用这样的方式生成的产物最后只有 default 导出:
// esbuild 的打包产物
// 省略大部分代码
export default react_default;
那么用户在使用这个依赖的时候,必须这么使用:
// ✅ 正确
import React from 'react';

const { useState } = React;

// ❌ 报错
import { useState } from 'react';
那为什么上述会报错的语法在 Vite 是可以正常使用的呢?原因是 Vite 在做 import 语句分析的时候,自动将你的代码进行改写了:
// 原来的写法
import { useState } from 'react';

// Vite 的 importAnalysis 插件转换后的写法类似下面这样
import react_default from '/node_modules/.vite/react.js';

const { useState } = react_default;
那么,还有没有别的方案来解决这个问题?没错,上述的插件代码中已经用另一个方案解决了这个问题,我们不妨把目光集中在下面这段代码中:
if (!imports.length && !exports.length) {
  // 构造代理模块
  // 通过 require 拿到模块的导出对象
  const res = require(entryPath);
  // 用 Object.keys 拿到所有的具名导出
  const specifiers = Object.keys(res);
  // 构造 export 语句交给 Esbuild 打包
  proxyModule.push(
    `export { ${specifiers.join(",")} } from "${entryPath}"`,
    `export default require("${entryPath}")`
  );
}
如此一来,Esbuild 预构建的产物中便会包含 CommonJS 模块中所有的导出信息:
// 预构建产物导出代码
export {
  react_default as default,
  useState,
  useEffect,
  // 省略其它导出
}
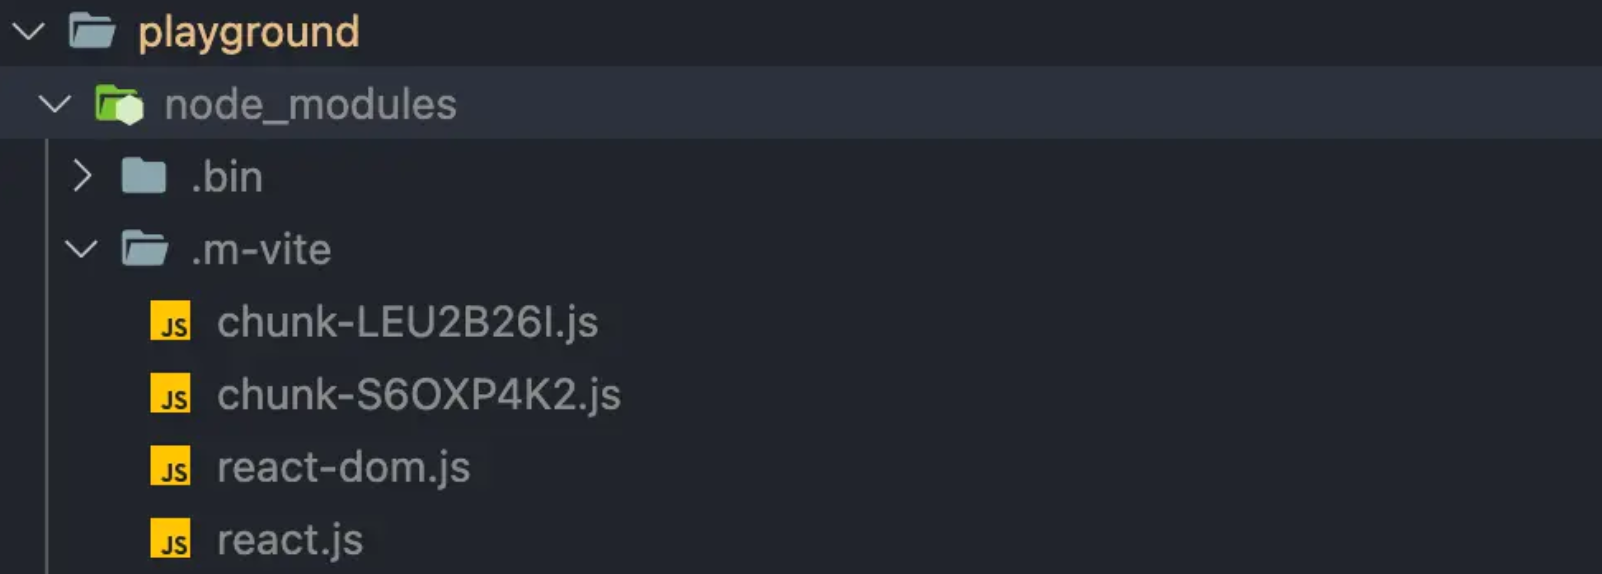
测试一下预构建整体的功能。在 playground 项目中执行 pnpm dev,接着查看项目的 node_modules 目录中,可以发现新增了.m-vite 目录及 react 、react-dom 的预构建产物:
插件机制开发
完成了依赖预构建的功能之后,开始搭建 Vite 的插件机制,实现插件容器和插件上下文对象。
首先可以新建 src/node/pluginContainer.ts 文件,增加如下的类型定义:
import type {
  LoadResult,
  PartialResolvedId,
  SourceDescription,
  PluginContext as RollupPluginContext,
  ResolvedId,
} from "rollup";

export interface PluginContainer {
  resolveId(id: string, importer?: string): Promise<PartialResolvedId | null>;
  load(id: string): Promise<LoadResult | null>;
  transform(code: string, id: string): Promise<SourceDescription | null>;
}
另外,由于插件容器需要接收 Vite 插件作为初始化参数,因此需要提前声明插件的类型,继续新建 src/node/plugin.ts 来声明如下的插件类型:
import { LoadResult, PartialResolvedId, SourceDescription } from "rollup";
import { ServerContext } from "./server";

export type ServerHook = (
  server: ServerContext
) => (() => void) | void | Promise<(() => void) | void>;

// 只实现以下这几个钩子
export interface Plugin {
  name: string;
  configureServer?: ServerHook;
  resolveId?: (
    id: string,
    importer?: string
  ) => Promise<PartialResolvedId | null> | PartialResolvedId | null;
  load?: (id: string) => Promise<LoadResult | null> | LoadResult | null;
  transform?: (
    code: string,
    id: string
  ) => Promise<SourceDescription | null> | SourceDescription | null;
  transformIndexHtml?: (raw: string) => Promise<string> | string;
}
对于其中的 ServerContext,你暂时不用过于关心,只需要在server/index.ts中简单声明一下类型即可:
// src/node/server/index.ts
// 增加如下类型声明
export interface ServerContext {}
接着实现插件机制的具体逻辑,主要集中在 createPluginContainer 函数中:
// src/node/pluginContainer.ts
// 模拟 Rollup 的插件机制
export const createPluginContainer = (plugins: Plugin[]): PluginContainer => {
  // 插件上下文对象
  // @ts-ignore 这里仅实现上下文对象的 resolve 方法
  class Context implements RollupPluginContext {
    async resolve(id: string, importer?: string) {
      let out = await pluginContainer.resolveId(id, importer);
      if (typeof out === "string") out = { id: out };
      return out as ResolvedId | null;
    }
  }
  // 插件容器
  const pluginContainer: PluginContainer = {
    async resolveId(id: string, importer?: string) {
      const ctx = new Context() as any;
      for (const plugin of plugins) {
        if (plugin.resolveId) {
          const newId = await plugin.resolveId.call(ctx as any, id, importer);
          if (newId) {
            id = typeof newId === "string" ? newId : newId.id;
            return { id };
          }
        }
      }
      return null;
    },
    async load(id) {
      const ctx = new Context() as any;
      for (const plugin of plugins) {
        if (plugin.load) {
          const result = await plugin.load.call(ctx, id);
          if (result) {
            return result;
          }
        }
      }
      return null;
    },
    async transform(code, id) {
      const ctx = new Context() as any;
      for (const plugin of plugins) {
        if (plugin.transform) {
          const result = await plugin.transform.call(ctx, code, id);
          if (!result) continue;
          if (typeof result === "string") {
            code = result;
          } else if (result.code) {
            code = result.code;
          }
        }
      }
      return { code };
    },
  };

  return pluginContainer;
};
上面的代码比较容易理解,并且关于插件钩子的执行原理和插件上下文对象的作用,在小册第 22 节中也有详细的分析,这里就不再赘述了。
接着,我们来完善一下之前的服务器逻辑:
// src/node/server/index.ts
import connect from "connect";
import { blue, green } from "picocolors";
import { optimize } from "../optimizer/index";
+ import { resolvePlugins } from "../plugins";
+ import { createPluginContainer, PluginContainer } from "../pluginContainer";

export interface ServerContext {
+  root: string;
+  pluginContainer: PluginContainer;
+  app: connect.Server;
+  plugins: Plugin[];
}

export async function startDevServer() {
  const app = connect();
  const root = process.cwd();
  const startTime = Date.now();
+  const plugins = resolvePlugins();
+  const pluginContainer = createPluginContainer(plugins);

+  const serverContext: ServerContext = {
+    root: process.cwd(),
+    app,
+    pluginContainer,
+    plugins,
+  };

+  for (const plugin of plugins) {
+    if (plugin.configureServer) {
+      await plugin.configureServer(serverContext);
+    }
+  }

  app.listen(3000, async () => {
    await optimize(root);
    console.log(
      green("🚀 No-Bundle 服务已经成功启动!"),
      `耗时: ${Date.now() - startTime}ms`
    );
    console.log(`> 本地访问路径: ${blue("http://localhost:3000")}`);
  });
}
其中 resolvePlugins 方法新建 src/node/plugins/index.ts 文件,内容如下:
import { Plugin } from "../plugin";

export function resolvePlugins(): Plugin[] {
  // 下一部分会逐个补充插件逻辑
  return [];
}
核心编译能力
入口 HTML 加载
基于如上的插件机制,来实现 Vite 的核心编译能力。
首先要考虑的就是入口 HTML 编译和加载的问题,可以通过一个服务中间件,配合插件机制来实现。具体而言,新建src/node/server/middlewares/indexHtml.ts,内容如下:
import { NextHandleFunction } from "connect";
import { ServerContext } from "../index";
import path from "path";
import { pathExists, readFile } from "fs-extra";

export function indexHtmlMiddware(serverContext: ServerContext): NextHandleFunction {
  return async (req, res, next) => {
    if (req.url === "/") {
      const { root } = serverContext;
      // 默认使用项目根目录下的 index.html
      const indexHtmlPath = path.join(root, "index.html");
      if (await pathExists(indexHtmlPath)) {
        const rawHtml = await readFile(indexHtmlPath, "utf8");
        let html = rawHtml;
        // 通过执行插件的 transformIndexHtml 方法来对 HTML 进行自定义的修改
        for (const plugin of serverContext.plugins) {
          if (plugin.transformIndexHtml) {
            html = await plugin.transformIndexHtml(html);
          }
        }

        res.statusCode = 200;
        res.setHeader("Content-Type", "text/html");
        return res.end(html);
      }
    }
    return next();
  };
}
然后在服务中应用这个中间件:
// src/node/server/index.ts
// 需要增加的引入语句
import { indexHtmlMiddware } from "./middlewares/indexHtml";

// 省略中间的代码

// 处理入口 HTML 资源
app.use(indexHtmlMiddware(serverContext));

app.listen(3000, async () => {
  // 省略
});
通过 pnpm dev 启动项目,然后访问 http://localhost:3000,从网络面板中你可以查看到 HTML 的内容已经成功返回:
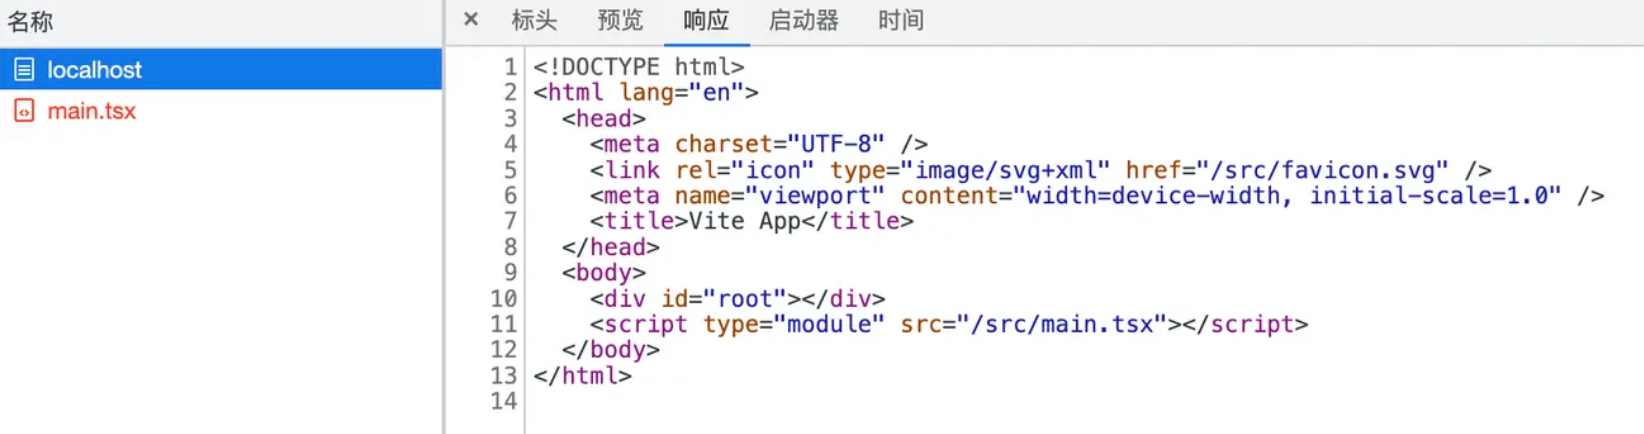
不过当前的页面并没有任何内容,因为 HTML 中引入的 TSX 文件并没有被正确编译。接下来,我们就来处理 TSX 文件的编译工作。
JS/TS/JSX/TSX 编译能力
首先新增中间件 src/node/server/middlewares/transform.ts,内容如下:
import { NextHandleFunction } from "connect";
import { isJSRequest, cleanUrl,} from "../../utils";
import { ServerContext } from "../index";
import createDebug from "debug";

const debug = createDebug("dev");

export async function transformRequest(url: string,serverContext: ServerContext) {
  const { pluginContainer } = serverContext;
  url = cleanUrl(url);
  // 简单来说,就是依次调用插件容器的 resolveId、load、transform 方法
  const resolvedResult = await pluginContainer.resolveId(url);
  let transformResult;
  if (resolvedResult?.id) {
    let code = await pluginContainer.load(resolvedResult.id);
    if (typeof code === "object" && code !== null) {
      code = code.code;
    }
    if (code) {
      transformResult = await pluginContainer.transform(
        code as string,
        resolvedResult?.id
      );
    }
  }
  return transformResult;
}

export function transformMiddleware(serverContext: ServerContext): NextHandleFunction {
  return async (req, res, next) => {
    if (req.method !== "GET" || !req.url) {
      return next();
    }
    const url = req.url;
    debug("transformMiddleware: %s", url);
    // transform JS request
    if (isJSRequest(url)) {
      // 核心编译函数
      let result = await transformRequest(url, serverContext);
      if (!result) {
        return next();
      }
      if (result && typeof result !== "string") {
        result = result.code;
      }
      // 编译完成,返回响应给浏览器
      res.statusCode = 200;
      res.setHeader("Content-Type", "application/javascript");
      return res.end(result);
    }

    next();
  };
}
同时,我们也需要补充如下的工具函数和常量定义:
// src/node/utils.ts
import { JS_TYPES_RE } from './constants.ts'

export const isJSRequest = (id: string): boolean => {
  id = cleanUrl(id);
  if (JS_TYPES_RE.test(id)) {
    return true;
  }
  if (!path.extname(id) && !id.endsWith("/")) {
    return true;
  }
  return false;
};

export const cleanUrl = (url: string): string =>
  url.replace(HASH_RE, "").replace(QEURY_RE, "");

// src/node/constants.ts
export const JS_TYPES_RE = /\.(?:j|t)sx?$|\.mjs$/;
export const QEURY_RE = /\?.*$/s;
export const HASH_RE = /#.*$/s;
从如上的核心编译函数 transformRequest 可以看出,Vite 对于 JS/TS/JSX/TSX 文件的编译流程主要是依次调用插件容器的如下方法:
- resolveId
- load
- transform
其中会经历众多插件的处理逻辑,那么,对于 TSX 文件的编译逻辑,也分散到了各个插件当中,具体来说主要包含以下的插件:
- 路径解析插件
- Esbuild 语法编译插件
- import 分析插件
接下来,我们就开始依次实现这些插件
1. 路径解析插件
当浏览器解析到如下的标签时:
<script type="module" src="/src/main.tsx"></script>会自动发送一个路径为 /src/main.tsx 的请求,但如果服务端不做任何处理,是无法定位到源文件的,随之会返回 404 状态码。
因此需要开发一个路径解析插件,对请求的路径进行处理,使之能转换真实文件系统中的路径。新建文src/node/plugins/resolve.ts,内容如下:
import resolve from "resolve";
import { Plugin } from "../plugin";
import { ServerContext } from "../server/index";
import path from "path";
import { pathExists } from "fs-extra";
import { DEFAULT_EXTERSIONS } from "../constants";
import { cleanUrl, normalizePath } from "../utils";

export function resolvePlugin(): Plugin {
  let serverContext: ServerContext;
  return {
    name: "m-vite:resolve",
    configureServer(s) {
      // 保存服务端上下文
      serverContext = s;
    },
    async resolveId(id: string, importer?: string) {
      // 1. 绝对路径
      if (path.isAbsolute(id)) {
        if (await pathExists(id)) {
          return { id };
        }
        // 加上 root 路径前缀,处理 /src/main.tsx 的情况
        id = path.join(serverContext.root, id);
        if (await pathExists(id)) {
          return { id };
        }
      }
      // 2. 相对路径
      else if (id.startsWith(".")) {
        if (!importer) {
          throw new Error("`importer` should not be undefined");
        }
        const hasExtension = path.extname(id).length > 1;
        let resolvedId: string;
        // 2.1 包含文件名后缀
        // 如 ./App.tsx
        if (hasExtension) {
          resolvedId = normalizePath(resolve.sync(id, { basedir: path.dirname(importer) }));
          if (await pathExists(resolvedId)) {
            return { id: resolvedId };
          }
        }
        // 2.2 不包含文件名后缀
        // 如 ./App
        else {
          // ./App -> ./App.tsx
          for (const extname of DEFAULT_EXTERSIONS) {
            try {
              const withExtension = `${id}${extname}`;
              resolvedId = normalizePath(resolve.sync(withExtension, {
                basedir: path.dirname(importer),
              }));
              if (await pathExists(resolvedId)) {
                return { id: resolvedId };
              }
            } catch (e) {
              continue;
            }
          }
        }
      }
      return null;
    },
  };
}
这样对于 /src/main.tsx,在插件中会转换为文件系统中的真实路径,从而让模块在 load 钩子中能够正常加载(加载逻辑在 Esbuild 语法编译插件实现)。
接着我们来补充一下目前缺少的常量:
// src/node/constants.ts
export const DEFAULT_EXTERSIONS = [".tsx", ".ts", ".jsx", "js"];
2. Esbuild 语法编译插件
这个插件将 JS/TS/JSX/TSX 编译成浏览器可以识别的 JS 语法,可以利用 Esbuild 的 Transform API 来实现。新建src/node/plugins/esbuild.ts 文件,内容如下:
import { readFile } from "fs-extra";
import { Plugin } from "../plugin";
import { isJSRequest } from "../utils";
import esbuild from "esbuild";
import path from "path";

export function esbuildTransformPlugin(): Plugin {
  return {
    name: "m-vite:esbuild-transform",
    // 加载模块
    async load(id) {
      if (isJSRequest(id)) {
        try {
          const code = await readFile(id, "utf-8");
          return code;
        } catch (e) {
          return null;
        }
      }
    },
    async transform(code, id) {
      if (isJSRequest(id)) {
        const extname = path.extname(id).slice(1);
        const { code: transformedCode, map } = await esbuild.transform(code, {
          target: "esnext",
          format: "esm",
          sourcemap: true,
          loader: extname as "js" | "ts" | "jsx" | "tsx",
        });
        return {
          code: transformedCode,
          map,
        };
      }
      return null;
    },
  };
}
3. import 分析插件
在将 TSX 转换为浏览器可以识别的语法之后,并不是直接返回给浏览器执行。还考虑如下的一些问题:
- 对于第三方依赖路径(bare import),需要重写为预构建产物路径;
- 对于绝对路径和相对路径,需要借助之前的路径解析插件进行解析。
在 import 分析插件中一一解决这些问题:
// 新建 src/node/plugins/importAnalysis.ts
import { init, parse } from "es-module-lexer";
import {
  BARE_IMPORT_RE,
  DEFAULT_EXTERSIONS,
  PRE_BUNDLE_DIR,
} from "../constants";
import {
  cleanUrl,
  isJSRequest,
  normalizePath
} from "../utils";
// magic-string 用来作字符串编辑
import MagicString from "magic-string";
import path from "path";
import { Plugin } from "../plugin";
import { ServerContext } from "../server/index";
import { pathExists } from "fs-extra";
import resolve from "resolve";

export function importAnalysisPlugin(): Plugin {
  let serverContext: ServerContext;
  return {
    name: "m-vite:import-analysis",
    configureServer(s) {
      // 保存服务端上下文
      serverContext = s;
    },
    async transform(code: string, id: string) {
      // 只处理 JS 相关的请求
      if (!isJSRequest(id)) {
        return null;
      }
      await init;
      // 解析 import 语句
      const [imports] = parse(code);
      const ms = new MagicString(code);
      // 对每一个 import 语句依次进行分析
      for (const importInfo of imports) {
        // 举例说明: const str = `import React from 'react'`
        // str.slice(s, e) => 'react'
        const { s: modStart, e: modEnd, n: modSource } = importInfo;
        if (!modSource) continue;
        // 第三方库: 路径重写到预构建产物的路径
        if (BARE_IMPORT_RE.test(modSource)) {
           const bundlePath = normalizePath(
            path.join('/', PRE_BUNDLE_DIR, `${modSource}.js`)
          );
          ms.overwrite(modStart, modEnd, bundlePath);
        } else if (modSource.startsWith(".") || modSource.startsWith("/")) {
          // 直接调用插件上下文的 resolve 方法,会自动经过路径解析插件的处理
          const resolved = await this.resolve(modSource, id);
          if (resolved) {
            ms.overwrite(modStart, modEnd, resolved.id);
          }
        }
      }

      return {
        code: ms.toString(),
        // 生成 SourceMap
        map: ms.generateMap(),
      };
    },
  };
}
现在完成了 JS 代码的 import 分析工作。接下来,把上面实现的三个插件进行注册:
// src/node/plugin/index.ts
import { esbuildTransformPlugin } from "./esbuild";
import { importAnalysisPlugin } from "./importAnalysis";
import { resolvePlugin } from "./resolve";
import { Plugin } from "../plugin";

export function resolvePlugins(): Plugin[] {
  return [resolvePlugin(), esbuildTransformPlugin(), importAnalysisPlugin()];
}
当然需要注册 transformMiddleware 中间件,在 src/node/server/index.ts 中增加代码如下:
app.use(transformMiddleware(serverContext));然后在 playground 项目下执行 pnpm dev,在浏览器里面访问 http://localhost:3000,可以在网络面板中发现 main.tsx 的内容以及被编译为下面这样:
同时,页面内容也能被渲染出来了:
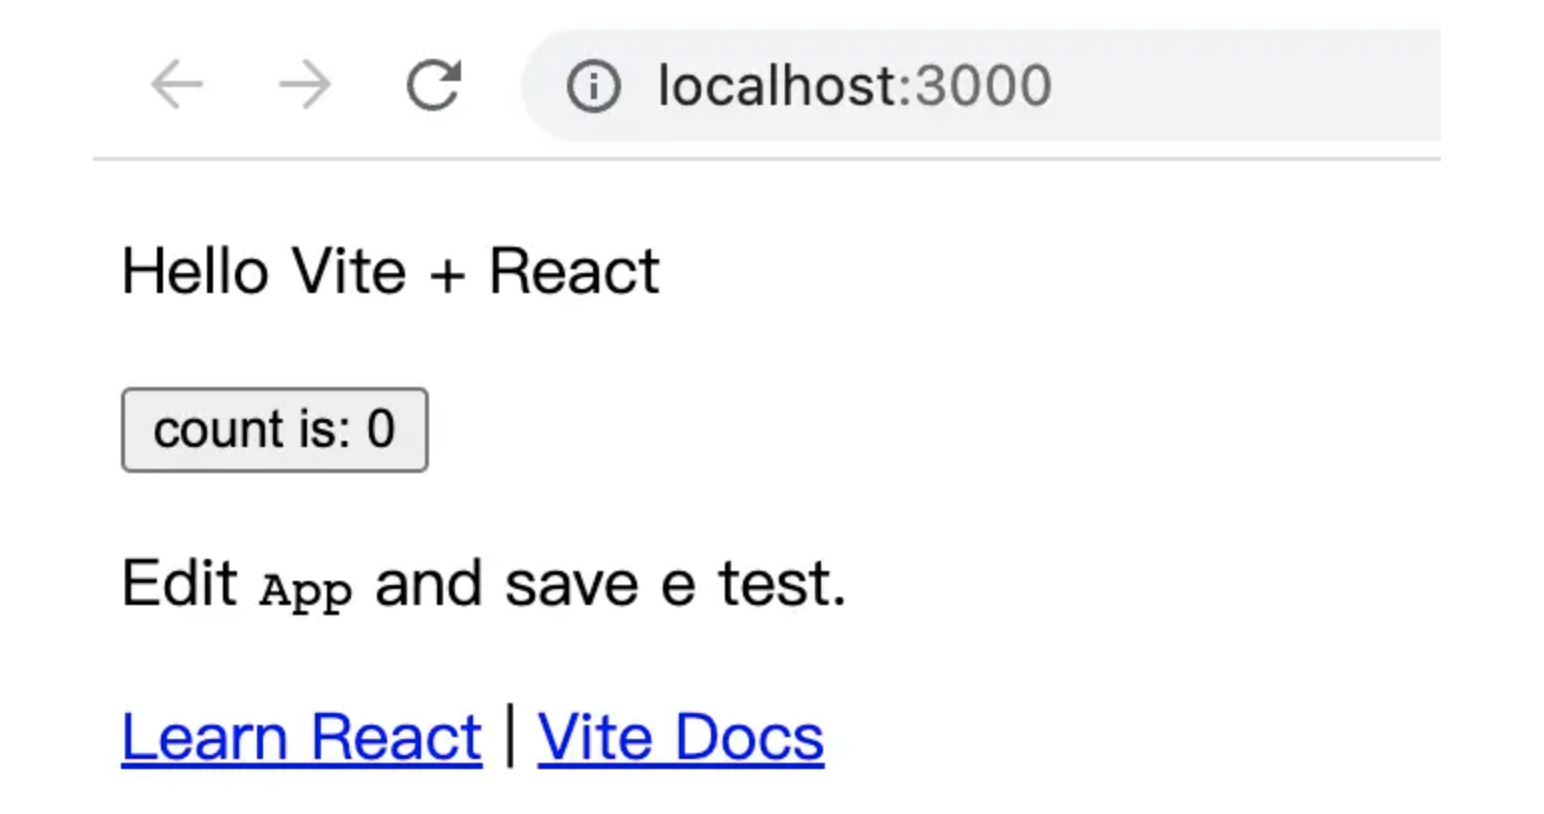
OK,目前为止我们就基本上完成 JS/TS/JSX/TSX 文件的编译
CSS 编译插件
// playground/src/main.tsx
import "./index.css";
为了让 CSS 能够在 no-bundle 服务中正常加载,需要将其包装成浏览器可以识别的模块格式,也就是 JS 模块 ,其中模块加载和转换的逻辑我们可以通过插件来实现。当然,首先需要在 transform 中间件中允许对 CSS 的请求进行处理,代码如下:
// src/node/server/middlewares/transform.ts
// 需要增加的导入语句
+ import { isCSSRequest } from '../../utils';
export function transformMiddleware(
serverContext: ServerContext): NextHandleFunction {
  return async (req, res, next) => {
    if (req.method !== "GET" || !req.url) {
      return next();
    }
    const url = req.url;
    debug("transformMiddleware: %s", url);
    // transform JS request
    	- if (isJSRequest(url)) {
      + if (isJSRequest(url) || isCSSRequest(url)) {
        // 后续代码省略
      }
      next();
    };
  }
补充对应的工具函数:
// src/node/utils.ts
export const isCSSRequest = (id: string): boolean => cleanUrl(id).endsWith(".css");
现在来开发 CSS 的编译插件,新建 src/node/plugins/css.ts 文件,内容如下:
import { readFile } from "fs-extra";
import { Plugin } from "../plugin";

export function cssPlugin(): Plugin {
  return {
    name: "m-vite:css",
    load(id) {
      // 加载
      if (id.endsWith(".css")) {
        return readFile(id, "utf-8");
      }
    },
    // 转换逻辑
    async transform(code, id) {
      if (id.endsWith(".css")) {
        // 包装成 JS 模块
        const jsContent = `
					const css = "${code.replace(/\n/g, "")}";
					const style = document.createElement("style");
					style.setAttribute("type", "text/css");
					style.innerHTML = css;
					document.head.appendChild(style);
					export default css;
				`.trim();

        return {
          code: jsContent,
        };
      }
      return null;
    },
  };
}
插件的逻辑比较简单,主要是将封装一层 JS 样板代码,将 CSS 包装成一个 ES 模块,当浏览器执行这个模块的时候,会通过一个 style 标签将 CSS 代码作用到页面中,从而使样式代码生效
接着来注册这个 CSS 插件:
// src/node/plugins/index.ts
+ import { cssPlugin } from "./css";
export function resolvePlugins(): Plugin[] {
  return [
    // 省略前面的插件
    + cssPlugin(),
  ];
}
通过 pnpm dev 来启动 playground 项目,不过在启动之前,需要保证 TSX 文件已经引入了对应的 CSS 文件:
// playground/src/main.tsx
import "./index.css";

// playground/src/App.tsx
import "./App.css";
在启动项目后,打开浏览器进行访问,可以看到样式已经正常生效
静态资源加载
以 playground 项目为例,来支持 svg 文件的加载。首先看看 svg 文件是如何被引入并使用的:
// playground/src/App.tsx
import logo from "./logo.svg";
function App() {
  return (<img className="App-logo" src={logo} alt="" />)
}
站在 no-bundle 服务的角度,可以分析出静态资源的两种请求:
- import 请求。如
import logo from "./logo.svg” - 资源内容请求。如 img 标签将资源 url 填入 src,那么浏览器会请求具体的资源内容
需要做两手准备: 对静态资源的 import 请求返回资源的 url;对于具体内容的请求,读取静态资源的文件内容,并响应给浏览器。
首先处理 import 请求,可以在 TSX 的 import 分析插件中,给静态资源相关的 import 语句做一个标记:
// src/node/plugins/importAnalysis.ts
async transform(code, id) {
  // 省略前面的代码
  for (const importInfo of imports) {
    const { s: modStart, e: modEnd, n: modSource } = importInfo;
    if (!modSource) continue;
    + // 静态资源
      + if (modSource.endsWith(".svg")) {
        + // 加上 ?import 后缀
          + const resolvedUrl = path.join(path.dirname(id), modSource);
        + ms.overwrite(modStart, modEnd, `${resolvedUrl}?import`);
        + continue;
      }
  }
}
编译后的 App.tsx 内容如下:
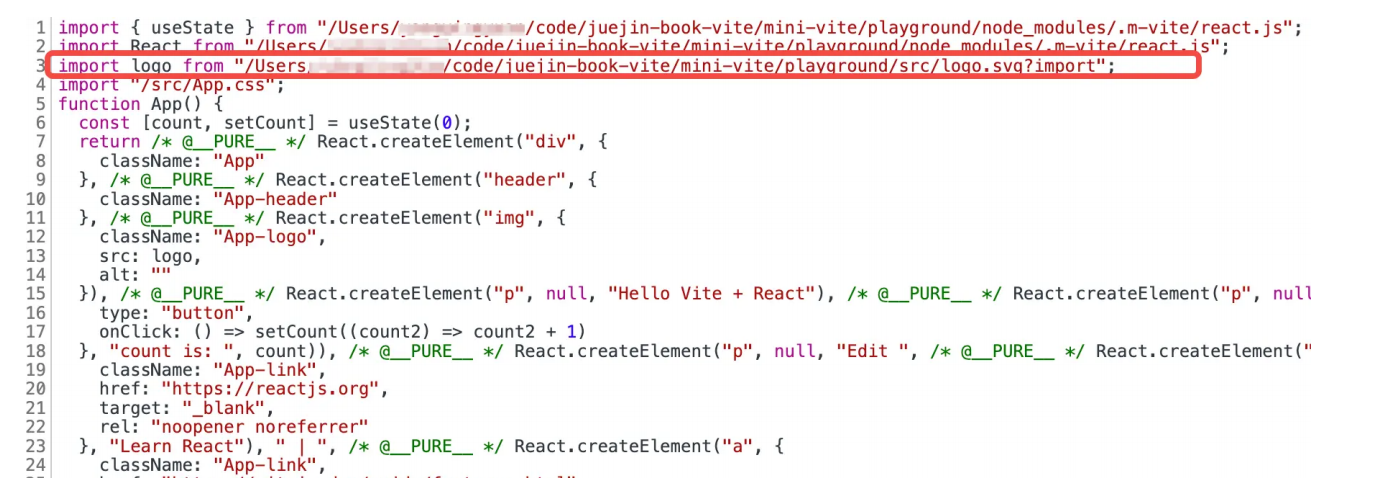
接着浏览器会发出带有 ?import 后缀的请求,在 transform 中间件进行处理:
// src/node/server/middlewares/transform.ts
// 需要增加的导入语句
+ import { isImportRequest } from '../../utils';
export function transformMiddleware(
serverContext: ServerContext
): NextHandleFunction {
  return async (req, res, next) => {
    if (req.method !== "GET" || !req.url) {
      return next();
    }
    const url = req.url;
    debug("transformMiddleware: %s", url);
    // transform JS request
    - if (isJSRequest(url) || isCSSRequest(url)) {
      + if (isJSRequest(url) || isCSSRequest(url) || isImportRequest(url)) {
        // 后续代码省略
      }
      next();
    };
  }
然后补充对应的工具函数:
// src/node/utils.ts
export function isImportRequest(url: string): boolean {
  return url.endsWith("?import");
}
此时就可以开发静态资源插件了。新建 src/node/plugins/assets.ts ,内容如下:
import { Plugin } from "../plugin";
import { cleanUrl, removeImportQuery } from "../utils";
export function assetPlugin(): Plugin {
  return {
    name: "m-vite:asset",
    async load(id) {
      const cleanedId = removeImportQuery(cleanUrl(id));
      // 这里仅处理 svg
      if (cleanedId.endsWith(".svg")) {
        return {
          // 包装成一个 JS 模块
          code: `export default "${cleanedId}"`,
        };
      }
    },
  };
}
接着来注册这个插件:
// src/node/plugins/index.ts
+ import { assetPlugin } from "./assets";
export function resolvePlugins(): Plugin[] {
 return [
 // 省略前面的插件
+ assetPlugin(),
 ];
}
处理完了静态资源的 import 请求,接着还需要处理非 import 请求,返回资源的具体内容。可以通过一个中间件来进行处理:
// src/node/server/middlewares/static.ts
import { NextHandleFunction } from "connect";
import { isImportRequest } from "../../utils";

// 一个用于加载静态资源的中间件
import sirv from "sirv";
export function staticMiddleware(): NextHandleFunction {
  const serveFromRoot = sirv("/", { dev: true });
  return async (req, res, next) => {
    if (!req.url) {
      return;
    }
    // 不处理 import 请求
    if (isImportRequest(req.url)) {
      return;
    }
    serveFromRoot(req, res, next);
  };
}
然后在服务中注册这个中间件:
// src/node/server/index.ts
// 需要添加的引入语句
+ import { staticMiddleware } from "./middlewares/static";
export async function startDevServer() {
  // 前面的代码省略
  + app.use(staticMiddleware());
  app.listen(3000, async () => {
    // 省略实现
  });
}
通过 pnpm dev 启动 playground 项目,在浏览器中访问,可以发现 svg 图片已经能够成功显示了。其实不光是 svg 文件,几乎所有格式的静态资源都可以按照如上的思路进行处理:
通过加入 ?import 后缀标识 import 请求,返回将静态资源封装成一个 JS 模块,即 export default xxx 的形式,导出资源的真实地址
对非 import 请求,响应静态资源的具体内容,通过 Content-Type 响应头告诉浏览器资源的类型(这部分工作 sirv 中间件已经帮我们做了)
模块依赖图开发
模块依赖图在 no-bundle 构建服务中是一个不可或缺的数据结构,一方面可以存储各个模块的信息,用于记录编译缓存,另一方面也可以记录各个模块间的依赖关系,用于实现 HMR。
接下来我们来实现模块依赖图,即 ModuleGraph 类,新建 src/node/ModuleGraph.ts ,内容如下:
import { PartialResolvedId, TransformResult } from "rollup";
import { cleanUrl } from "./utils";

export class ModuleNode {
  url: string; // 资源访问 url
  id: string | null = null; // 资源绝对路径
  importers = new Set<ModuleNode>();
  importedModules = new Set<ModuleNode>();
  transformResult: TransformResult | null = null;
  lastHMRTimestamp = 0;
  constructor(url: string) {
    this.url = url;
  }
}

export class ModuleGraph {
  // 资源 url 到 ModuleNode 的映射表
  urlToModuleMap = new Map<string, ModuleNode>();
  // 资源绝对路径到 ModuleNode 的映射表
  idToModuleMap = new Map<string, ModuleNode>();

  constructor(private resolveId: (url: string) => Promise<PartialResolvedId | null>) {}

  getModuleById(id: string): ModuleNode | undefined {
    return this.idToModuleMap.get(id);
  }

  async getModuleByUrl(rawUrl: string): Promise<ModuleNode | undefined> {
    const { url } = await this._resolve(rawUrl);
    return this.urlToModuleMap.get(url);
  }

  async ensureEntryFromUrl(rawUrl: string): Promise<ModuleNode> {
    const { url, resolvedId } = await this._resolve(rawUrl);
    // 首先检查缓存
    if (this.urlToModuleMap.has(url)) {
      return this.urlToModuleMap.get(url) as ModuleNode;
    }
    // 若无缓存,更新 urlToModuleMap 和 idToModuleMap
    const mod = new ModuleNode(url);
    mod.id = resolvedId;
    this.urlToModuleMap.set(url, mod);
    this.idToModuleMap.set(resolvedId, mod);
    return mod;
  }

  async updateModuleInfo(
  mod: ModuleNode,
   importedModules: Set<string | ModuleNode>
  ) {
    const prevImports = mod.importedModules;
    for (const curImports of importedModules) {
      const dep =
            typeof curImports === "string"
      ? await this.ensureEntryFromUrl(cleanUrl(curImports))
      : curImports;
      if (dep) {
        mod.importedModules.add(dep);
        dep.importers.add(mod);
      }
    }
    // 清除已经不再被引用的依赖
    for (const prevImport of prevImports) {
      if (!importedModules.has(prevImport.url)) {
        prevImport.importers.delete(mod);
      }
    }
  }

  invalidateModule(file: string) {
    const mod = this.idToModuleMap.get(file);
    if (mod) {
      mod.lastHMRTimestamp = Date.now();
      mod.transformResult = null;
      mod.importers.forEach((importer) => {
        this.invalidateModule(importer.id!);
      });
    }
  }

  private async _resolve(
  url: string
  ): Promise<{ url: string; resolvedId: string }> {
    const resolved = await this.resolveId(url);
    const resolvedId = resolved?.id || url;
    return { url, resolvedId };
  }
}
相信经过第 23 小节的学习,已经对模块依赖图的实现结构比较熟悉了,对于代码细节这里也不再赘述。接着我们看看如何将这个 ModuleGraph 接入到目前的架构中。
首先在服务启动前,需要初始化 ModuleGraph 实例:
// src/node/server/index.ts
+ import { ModuleGraph } from "../ModuleGraph";
export interface ServerContext {
  root: string;
  pluginContainer: PluginContainer;
  app: connect.Server;
  plugins: Plugin[];
  + moduleGraph: ModuleGraph;
}

export async function startDevServer() {
  + const moduleGraph = new ModuleGraph((url) => pluginContainer.resolveId(url));
  const pluginContainer = createPluginContainer(plugins);
  const serverContext: ServerContext = {
    root: process.cwd(),
    app,
    pluginContainer,
    plugins,
    + moduleGraph
  };

}
然后在加载完模块后,也就是调用插件容器的 load 方法后,需要通过 ensureEntryFromUrl 方法注册模块:
// src/node/server/middlewares/transform.ts
let code = await pluginContainer.load(resolvedResult.id);
if (typeof code === "object" && code !== null) {
  code = code.code;
}
+ const { moduleGraph } = serverContext;
+ mod = await moduleGraph.ensureEntryFromUrl(url);
当对 JS 模块分析完 import 语句之后,需要更新模块之间的依赖关系:
// src/node/plugins/importAnalysis.ts
export function importAnalysis() {
  return {
    transform(code: string, id: string) {
      // 省略前面的代码
      + const { moduleGraph } = serverContext;
      + const curMod = moduleGraph.getModuleById(id)!;
      + const importedModules = new Set<string>();
      for(const importInfo of imports) {
        // 省略部分代码
        if (BARE_IMPORT_RE.test(modSource)) {
          // 省略部分代码
          + importedModules.add(bundlePath);
        } else if (modSource.startsWith(".") || modSource.startsWith("/")) {
          const resolved = await resolve(modSource, id);
          if (resolved) {
            ms.overwrite(modStart, modEnd, resolved);
            + importedModules.add(resolved);
          }
        }
      }
      + moduleGraph.updateModuleInfo(curMod, importedModules);
      // 省略后续 return 代码
    }
  }
}
现在,一个完整的模块依赖图就能随着 JS 请求的到来而不断建立起来了。另外,基于现在的模块依赖图,也可以记录模块编译后的产物,并进行缓存。让我们回到 transform 中间件中:
export async function transformRequest(url: string,serverContext: ServerContext) {
  const { moduleGraph, pluginContainer } = serverContext;
  url = cleanUrl(url);
  + let mod = await moduleGraph.getModuleByUrl(url);
  + if (mod && mod.transformResult) {
    + return mod.transformResult;
    + }
    const resolvedResult = await pluginContainer.resolveId(url);
    let transformResult;
    if (resolvedResult?.id) {
      let code = await pluginContainer.load(resolvedResult.id);
      if (typeof code === "object" && code !== null) {
        code = code.code;
      }
      mod = await moduleGraph.ensureEntryFromUrl(url);
      if (code) {
        transformResult = await pluginContainer.transform(
          code as string,
          resolvedResult?.id
        );
      }
    }
    + if (mod) {
      + mod.transformResult = transformResult;
      + }
      return transformResult;
    }
在搭建好模块依赖图之后,把目光集中到最重要的部分——HMR 上面
HMR 服务端
HMR 在服务端需要完成如下的工作:
- 创建文件监听器,以监听文件的变动
- 创建 WebSocket 服务端,负责和客户端进行通信
- 文件变动时,从 ModuleGraph 中定位到需要更新的模块,将更新信息发送给客户端
首先来创建文件监听器:
// src/node/server/index.ts
import chokidar, { FSWatcher } from "chokidar";
export async function startDevServer() {
  const watcher = chokidar.watch(root, {
    ignored: ["**/node_modules/**", "**/.git/**"],
    ignoreInitial: true,
  });
}
接着初始化 WebSocket 服务端,新建 src/node/ws.ts ,内容如下:
import connect from "connect";
import { red } from "picocolors";
import { WebSocketServer, WebSocket } from "ws";
import { HMR_PORT } from "./constants";
export function createWebSocketServer(server: connect.Server): {
  send: (msg: string) => void;
  close: () => void;
} {
  let wss: WebSocketServer;
  wss = new WebSocketServer({ port: HMR_PORT });
  wss.on("connection", (socket) => {
    socket.send(JSON.stringify({ type: "connected" }));
  });
  wss.on("error", (e: Error & { code: string }) => {
    if (e.code !== "EADDRINUSE") {
      console.error(red(`WebSocket server error:\n${e.stack || e.message}`));
    }
  });
  return {
    send(payload: Object) {
      const stringified = JSON.stringify(payload);
      wss.clients.forEach((client) => {
        if (client.readyState === WebSocket.OPEN) {
          client.send(stringified);
        }
      });
    },
    close() {
      wss.close();
    },
  };
}
同时定义 HMR_PORT 常量:
// src/node/constants.ts
export const HMR_PORT = 24678;
接着将 WebSocket 服务端实例加入 no-bundle 服务中:
// src/node/server/index.ts
export interface ServerContext {
  root: string;
  pluginContainer: PluginContainer;
  app: connect.Server;
  plugins: Plugin[];
  moduleGraph: ModuleGraph;
  + ws: { send: (data: any) => void; close: () => void };
         + watcher: FSWatcher;
        }
export async function startDevServer() {
  + // WebSocket 对象
    + const ws = createWebSocketServer(app);
  //  开发服务器上下文
  const serverContext: ServerContext = {
    root: process.cwd(),
    app,
    pluginContainer,
    plugins,
    moduleGraph,
    + ws,
    + watcher
  };
}
下面实现当文件变动时,服务端具体的处理逻辑,新建 src/node/hmr.ts :
import { ServerContext } from "./server/index";
import { blue, green } from "picocolors";
import { getShortName } from "./utils";

export function bindingHMREvents(serverContext: ServerContext) {
  const { watcher, ws, root } = serverContext;
  watcher.on("change", async (file) => {
    console.log(`✨${blue("[hmr]")} ${green(file)} changed`);
    const { moduleGraph } = serverContext;
    // 清除模块依赖图中的缓存
    await moduleGraph.invalidateModule(file);
    // 向客户端发送更新信息
    ws.send({
      type: "update",
      updates: [
        {
          type: "js-update",
          timestamp: Date.now(),
          path: "/" + getShortName(file, root),
          acceptedPath: "/" + getShortName(file, root),
        },
      ],
    });
  });
}
注意补充一下缺失的工具函数:
// src/node/utils.ts
export function getShortName(file: string, root: string) {
  return file.startsWith(root + "/") ? path.posix.relative(root, file) : file;
}
接着在服务中添加如下代码:
// src/node/server/index.ts
+ import { bindingHMREvents } from "../hmr";
// 开发服务器上下文
const serverContext: ServerContext = {
 root: process.cwd(),
 app,
 pluginContainer,
 plugins,
 moduleGraph,
 ws,
 watcher,
};
+ bindingHMREvents(serverContext);
HMR 客户端
HMR 客户端指的是向浏览器中注入的一段 JS 脚本,这段脚本中会做如下的事情:
- 创建 WebSocket 客户端,用于和服务端通信
- 在收到服务端的更新信息后,通过动态 import 拉取最新的模块内容,执行 accept 更新回调
- 暴露 HMR 的一些工具函数,比如 import.meta.hot 对象的实现
首先来开发客户端的脚本内容,你可以新建 src/client/client.ts 文件,然后在 tsup.config.ts 中增加如下的配置:
import { defineConfig } from "tsup";
export default defineConfig({
  entry: {
    index: "src/node/cli.ts",
    + client: "src/client/client.ts",
  },
});
注: 改动 tsup 配置之后,为了使最新配置生效,你需要在 mini-vite 项目中执行 pnpm start 重新进行构建
客户端脚本的具体实现如下:
// src/client/client.ts
console.log("[vite] connecting...");
// 1. 创建客户端 WebSocket 实例
// 其中的 __HMR_PORT__ 之后会被 no-bundle 服务编译成具体的端口号
const socket = new WebSocket(`ws://localhost:__HMR_PORT__`, "vite-hmr");
// 2. 接收服务端的更新信息
socket.addEventListener("message", async ({ data }) => {
  handleMessage(JSON.parse(data)).catch(console.error);
});
// 3. 根据不同的更新类型进行更新
async function handleMessage(payload: any) {
  switch (payload.type) {
    case "connected":
      console.log(`[vite] connected.`);
      // 心跳检测
      setInterval(() => socket.send("ping"), 1000);
      break;
    case "update":
      // 进行具体的模块更新
      payload.updates.forEach((update: Update) => {
        if (update.type === "js-update") {
          // 具体的更新逻辑,后续来开发
        }
      });
      break;
  }
}
关于客户端具体的 JS 模块更新逻辑和工具函数的实现,你暂且不用过于关心。先把这段比较简单的 HMR 客户端代码注入到浏览器中,首先在新建 src/node/plugins/clientInject.ts ,内容如下:
import { CLIENT_PUBLIC_PATH, HMR_PORT } from "../constants";
import { Plugin } from "../plugin";
import fs from "fs-extra";
import path from "path";
import { ServerContext } from "../server/index";

export function clientInjectPlugin(): Plugin {
  let serverContext: ServerContext;
  return {
    name: "m-vite:client-inject",
    configureServer(s) {
      serverContext = s;
    },
    resolveId(id) {
      if (id === CLIENT_PUBLIC_PATH) {
        return { id };
      }
      return null;
    },
    async load(id) {
      // 加载 HMR 客户端脚本
      if (id === CLIENT_PUBLIC_PATH) {
        const realPath = path.join(
          serverContext.root,
          "node_modules",
          "mini-vite",
          "dist",
          "client.mjs"
        );
        const code = await fs.readFile(realPath, "utf-8");
        return {
          // 替换占位符
          code: code.replace("__HMR_PORT__", JSON.stringify(HMR_PORT)),
        };
      }
    },
    transformIndexHtml(raw) {
      // 插入客户端脚本
      // 即在 head 标签后面加上 <script type="module" src="/@vite/client"></script>
      // 注: 在 indexHtml 中间件里面会自动执行 transformIndexHtml 钩子
      return raw.replace(
        /(<head[^>]*>)/i,
        `$1<script type="module" src="${CLIENT_PUBLIC_PATH}"></script>`
      );
    },
  };
}
同时添加相应的常量声明:
// src/node/constants.ts
export const CLIENT_PUBLIC_PATH = "/@vite/client";
接着来注册这个插件:
// src/node/plugins/index.ts
+ import { clientInjectPlugin } from './clientInject';
export function resolvePlugins(): Plugin[] {
  return [
    + clientInjectPlugin()
    // 省略其它插件
  ]
}
需要注意的是, clientInject 插件最好放到最前面的位置,以免后续插件的 load 钩子干扰客户端脚本的加载。
接下来你可以在 playground 项目下执行 pnpm dev ,然后查看页面,可以发现控制台出现了如下的 log 信息:
[vite]connecting...
[vite]connected...
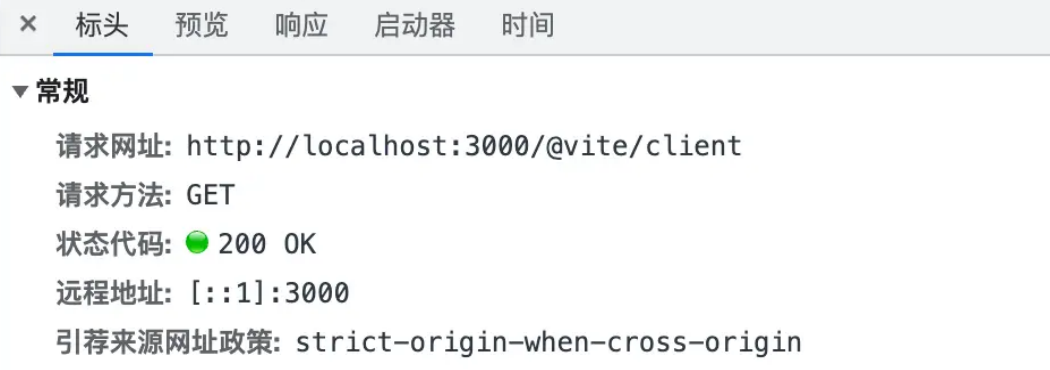
查看网络面板,也能发现客户端脚本的请求被正常响应:
值得一提的是,之所以可以在代码中编写类似 import.meta.hot.xxx 之类的方法,是因为 Vite 在模块最顶层注入了 import.meta.hot 对象,而这个对象由createHotContext 来实现,具体的注入代码如下所示:
import { createHotContext as __vite__createHotContext } from "/@vite/client";
import.meta.hot = __vite__createHotContext("/src/App.tsx");
下面在 import 分析插件中做一些改动,实现插入这段代码的功能:
import { init, parse } from "es-module-lexer";
import {
  BARE_IMPORT_RE,
  CLIENT_PUBLIC_PATH,
  PRE_BUNDLE_DIR,
} from "../constants";
import {
  cleanUrl,
  + getShortName,
  isJSRequest,
} from "../utils";
import MagicString from "magic-string";
import path from "path";
import { Plugin } from "../plugin";
import { ServerContext } from "../server/index";
export function importAnalysisPlugin(): Plugin {
  let serverContext: ServerContext;
  return {
    name: "m-vite:import-analysis",
    configureServer(s) {
      serverContext = s;
    },
    async transform(code: string, id: string) {
      + if (!isJSRequest(id) || isInternalRequest(id)) {
        return null;
      }
      await init;
      const importedModules = new Set<string>();
      const [imports] = parse(code);
      const ms = new MagicString(code);
      + const resolve = async (id: string, importer?: string) => {
        + const resolved = await this.resolve(
          + id,
          + importer
          + );
          + if (!resolved) {
          + return;
          + }
            + const cleanedId = cleanUrl(resolved.id);
          + const mod = moduleGraph.getModuleById(cleanedId);
          + let resolvedId = `/${getShortName(resolved.id, serverContext.root)}`;
          + if (mod && mod.lastHMRTimestamp > 0) {
            + resolvedId += "?t=" + mod.lastHMRTimestamp;
            + }
              + return resolvedId;
            + };

            const { moduleGraph } = serverContext;
            const curMod = moduleGraph.getModuleById(id)!;
            for (const importInfo of imports) {
              const { s: modStart, e: modEnd, n: modSource } = importInfo;
              if (!modSource || isInternalRequest(modSource)) continue;
              // 静态资源
              if (modSource.endsWith(".svg")) {
                // 加上 ?import 后缀
                const resolvedUrl = path.join(path.dirname(id), modSource);
                ms.overwrite(modStart, modEnd, `${resolvedUrl}?import`);
                continue;
              }
              // 第三方库: 路径重写到预构建产物的路径
              if (BARE_IMPORT_RE.test(modSource)) {
                const bundlePath = path.join(
                  serverContext.root,
                  PRE_BUNDLE_DIR,
                  `${modSource}.js`
                );
                ms.overwrite(modStart, modEnd, bundlePath);
                importedModules.add(bundlePath);
              } else if (modSource.startsWith(".") || modSource.startsWith("/")) {
                + const resolved = await resolve(modSource, id);
                if (resolved) {
                  ms.overwrite(modStart, modEnd, resolved);
                  importedModules.add(resolved);
                }
              }
            }
            // 只对业务源码注入
            + if (!id.includes("node_modules")) {
              // 注入 HMR 相关的工具函数
              ms.prepend(
                `import { createHotContext as __vite__createHotContext } from "${CLIENT_PUBLIC_PATH}";` +
                `import.meta.hot = __vite__createHotContext(${JSON.stringify(
                  cleanUrl(curMod.url)
                )});`
              );
            }
            moduleGraph.updateModuleInfo(curMod, importedModules);
            return {
              code: ms.toString(),
              map: ms.generateMap(),
            };
          },
        };
      }
接着启动 playground,打开页面后你可以发现 import.meta.hot 的实现代码已经被成功插入:

现在回到客户端脚本的实现中,来开发 createHotContext 这个工具方法:
interface HotModule {
  id: string;
  callbacks: HotCallback[];
}

interface HotCallback {
  deps: string[];
  fn: (modules: object[]) => void;
}

// HMR 模块表
const hotModulesMap = new Map<string, HotModule>();

// 不在生效的模块表
const pruneMap = new Map<string, (data: any) => void | Promise<void>>();
export const createHotContext = (ownerPath: string) => {
  const mod = hotModulesMap.get(ownerPath);
  if (mod) {
    mod.callbacks = [];
  }
  function acceptDeps(deps: string[], callback: any) {
    const mod: HotModule = hotModulesMap.get(ownerPath) || {
      id: ownerPath,
      callbacks: [],
    };
    // callbacks 属性存放 accept 的依赖、依赖改动后对应的回调逻辑
    mod.callbacks.push({
      deps,
      fn: callback,
    });
    hotModulesMap.set(ownerPath, mod);
  }
  return {
    accept(deps: any, callback?: any) {
      // 这里仅考虑接受自身模块更新的情况
      // import.meta.hot.accept()
      if (typeof deps === "function" || !deps) {
        acceptDeps([ownerPath], ([mod]) => deps && deps(mod));
      }
    },
    // 模块不再生效的回调
    // import.meta.hot.prune(() => {})
    prune(cb: (data: any) => void) {
      pruneMap.set(ownerPath, cb);
    },
};
};
在 accept 方法中会用 hotModulesMap 这张表记录该模块所 accept 的模块,以及 accept 的模块更新之后回调逻辑。
接着来开发客户端热更新的具体逻辑,也就是服务端传递更新内容之后客户端如何来派发更新
async function fetchUpdate({ path, timestamp }: Update) {
  const mod = hotModulesMap.get(path);
  if (!mod) return;
  const moduleMap = new Map();
  const modulesToUpdate = new Set<string>();
  modulesToUpdate.add(path);
  await Promise.all(
    Array.from(modulesToUpdate).map(async (dep) => {
      const [path, query] = dep.split(`?`);
      try {
        // 通过动态 import 拉取最新模块
        const newMod = await import(
          path + `?t=${timestamp}${query ? `&${query}` : ""}`
        );
        moduleMap.set(dep, newMod);
      } catch (e) {}
    })
  );
  return () => {
    // 拉取最新模块后执行更新回调
    for (const { deps, fn } of mod.callbacks) {
      fn(deps.map((dep: any) => moduleMap.get(dep)));
    }
    console.log(`[vite] hot updated: ${path}`);
  };
}
现在可以来初步测试一下 HMR 的功能,可以暂时将 main.tsx 的内容换成下面这样:
import React from "react";
import ReactDOM from "react-dom";
import "./index.css";
const App = () => <div>hello 123123</div>;
ReactDOM.render(<App />, document.getElementById("root"));

// @ts-ignore
import.meta.hot.accept(() => {
  ReactDOM.render(<App />, document.getElementById("root"));
});
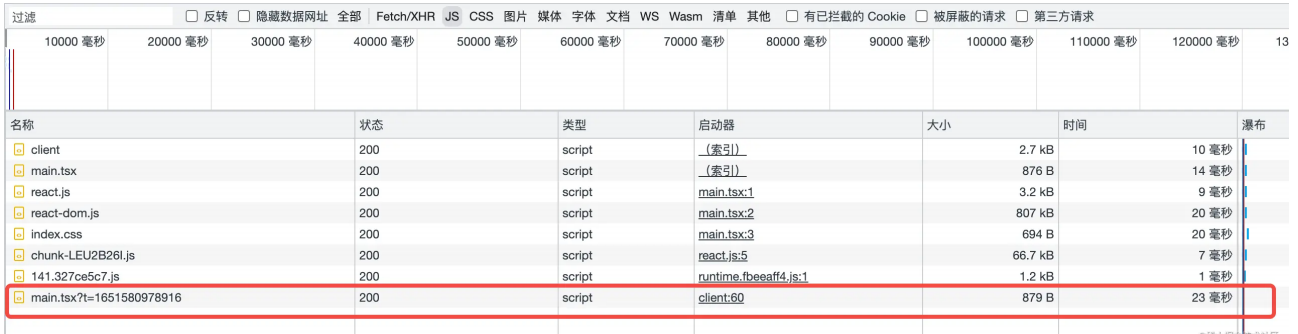
启动 playground,然后打开浏览器,现在回到编辑器中,修改文本内容,然后保存,你可以发现页面内容也跟着发生了变化,并且网络面板发出了拉取最新模块的请求,说明 HMR 已经成功生效:
同时,当你再次刷新页面,看到的仍然是最新的页面内容。这一点非常重要,之所以能达到这样的效果,是因为在文件改动后会调用 ModuleGraph 的 invalidateModule 方法,这个方法会清除热更模块以及所有上层引用方模块的编译缓存:
// 方法实现
invalidateModule(file: string) {
  const mod = this.idToModuleMap.get(file);
  if (mod) {
    mod.lastHMRTimestamp = Date.now();
    mod.transformResult = null;
    mod.importers.forEach((importer) => {
      this.invalidateModule(importer.id!);
                            });
  }
}
这样每次经过 HMR 后,再次刷新页面,渲染出来的一定是最新的模块内容。
当然,也可以对 CSS 实现热更新功能,在客户端脚本中添加如下的工具函数:
const sheetsMap = new Map();

export function updateStyle(id: string, content: string) {
  let style = sheetsMap.get(id);
  if (!style) {
    // 添加 style 标签
    style = document.createElement("style");
    style.setAttribute("type", "text/css");
    style.innerHTML = content;
    document.head.appendChild(style);
  } else {
    // 更新 style 标签内容
    style.innerHTML = content;
  }
  sheetsMap.set(id, style);
}

export function removeStyle(id: string): void {
  const style = sheetsMap.get(id);
if (style) {
  document.head.removeChild(style);
}
sheetsMap.delete(id);
}
紧接着调整一下 CSS 编译插件的代码:
import { readFile } from "fs-extra";
import { CLIENT_PUBLIC_PATH } from "../constants";
import { Plugin } from "../plugin";
import { ServerContext } from "../server";
import { getShortName } from "../utils";
export function cssPlugin(): Plugin {
  let serverContext: ServerContext;
  return {
    name: "m-vite:css",
    configureServer(s) {
      serverContext = s;
    },
    load(id) {
      if (id.endsWith(".css")) {
        return readFile(id, "utf-8");
      }
    },
    // 主要变动在 transform 钩子中
    async transform(code, id) {
      if (id.endsWith(".css")) {
        // 包装成 JS 模块
        const jsContent = `
import { createHotContext as __vite__createHotContext } from "${CLIENT_PUBLIC_PATH}";
import.meta.hot = __vite__createHotContext("/${getShortName(id, serverContext.root)}");
import { updateStyle, removeStyle } from "${CLIENT_PUBLIC_PATH}"

const id = '${id}';
const css = '${code.replace(/\n/g, "")}';
updateStyle(id, css);
import.meta.hot.accept();
export default css;
import.meta.hot.prune(() => removeStyle(id));`.trim();
        return {
          code: jsContent,
        };
      }
      return null;
    },
  };
}
最后重启 playground 项目,本地尝试修改 CSS 代码,可以看到热更新效果