实现 Vue 跨端渲染
自定义渲染器可以自定义 Vue 渲染的逻辑。在给你讲清楚原理之后,还会带你一起实现一个 Canvas 的渲染器实际上手体验一下
渲染器
Vue 内部的组件是以虚拟 dom 形式存在的。下面的代码就是一个很常见的虚拟 Dom,用对象的方式去描述一个项目。相比 dom 标签相比,这种形式可以让整个 Vue 项目脱离浏览器的限制,更方便地实现 Vuejs 的跨端
{
  tag: 'div',
  props: {
    id: 'app'
  },
  chidren: [
    {
      tag: Container,
      props: {
        className: 'el-container'
      },
      chidren: [
        'hello world'
      ]
    }
  ]
}
渲染器是围绕虚拟 Dom 存在的。在浏览器中把虚拟 Dom 渲染成真实的 Dom 对象,Vue 源码内部把一个框架里所有和平台相关的操作,抽离成了独立的方法。所以只需要实现下面这些方法,就可以实现 Vue 3 在一个平台的渲染
首先用 createElement 创建标签,还有用 createText 创建文本。创建之后使用 insert 新增元素,通过 remove 删除元素,通过 setText 更新文本和 patchProps 修改属性。然后再实现 parentNode、nextSibling 等方法实现节点的查找关系。完成这些工作,理论上就可以在一个平台内实现一个应用了。
在 Vue 3 中的 runtime-core 模块,就对外暴露了这些接口,runtime-core 内部基于这些函数实现了整个 Vue 内部的所有操作,然后在 runtime-dom 中传入以上所有方法。
下面的代码就是 Vue 代码提供浏览器端操作的函数,这些 DOM 编程接口完成了浏览器端增加、添加和删除操作,这些 API 都是浏览器端独有的,如果一个框架强依赖于这些函数,那就只能在浏览器端运行
export const nodeOps: Omit<RendererOptions<Node, Element>, 'patchProp'> = {
  //插入元素
  insert: (child, parent, anchor) => {
    parent.insertBefore(child, anchor || null)
  },
  // 删除元素
  remove: child => {
    const parent = child.parentNode
    if (parent) {
      parent.removeChild(child)
    }
  },
  // 创建元素
  createElement: (tag, isSVG, is, props): Element => {
    const el = isSVG? doc.createElementNS(svgNS, tag):doc.createElement(tag, is ? { is } : undefined)

    if (tag === 'select' && props && props.multiple != null) {
      ;(el as HTMLSelectElement).setAttribute('multiple', props.multiple)
    }

    return el
  }
  //...其他操作函数
}
如果一个框架想要实现实现跨端的功能,那么渲染器本身不能依赖任何平台下特有的接口。
在后面的代码中通过 createRenderer 函数区创建了一个渲染器。通过参数 options 获取增删改查所有的函数以后,在内部的 render、mount、patch 等函数中,需要去渲染一个元素的时候,就可以通过 option.createElement 和 option.insert 来实现
这段代码给你展现的是核心逻辑,完整版本你可以看一下 Vue 3 的源码
export default function createRenderer(options) {
  const {
      insert: hostInsert,
      remove: hostRemove,
      patchProp: hostPatchProp,
      createElement: hostCreateElement,
      createText: hostCreateText,
      createComment: hostCreateComment,
      setText: hostSetText,
      setElementText: hostSetElementText,
      parentNode: hostParentNode,
      nextSibling: hostNextSibling,
      setScopeId: hostSetScopeId = NOOP,
      cloneNode: hostCloneNode,
      insertStaticContent: hostInsertStaticContent
   } = options

  function render(vnode, container) {  }

  function mount(vnode, container, isSVG, refNode) {  }

  function mountElement(vnode, container, isSVG, refNode) {  }

  function mountText(vnode, container) {  }

  function patch(prevVNode, nextVNode, container) {  }

  function replaceVNode(prevVNode, nextVNode, container) {  }
  function patchElement(prevVNode, nextVNode, container) {  }
  function patchChildren(
    prevChildFlags,
    nextChildFlags,
    prevChildren,
    nextChildren,
    container
  ) {  }

  function patchText(prevVNode, nextVNode) {  }
  function patchComponent(prevVNode, nextVNode, container) {  }

  return { render }
}
在每个函数实现的内部,比如 mountElemnt 之前的实现方式是调用浏览器的 API 创建
function mountElement(vnode, container, isSVG, refNode) {
  const el = isSVG
    ? document.createElementNS(....)
    : document.createElement(vnode.tag)
}
对比一下,经过渲染器抽离之后,内部的 mountElmenet 就会把所有 document 的操作全部换成 options 传递进来的 hostCreate 函数
function mountElement(vnode, container, isSVG, refNode) {
  const el = hostCreateElement(vnode.tag, isSVG)
}
然后使用后面的代码创建一个具体平台的渲染器,这也是 Vue 3 中的 runtime-dom 包主要做的事。了解了 Vue 中自定义渲染器的实现方式后,还可以基于 Vue 3 的 runtime-core 包封装其他平台的渲染器,让其他平台也能使用 Vue 内部的响应式和组件化等优秀的特性
const { render } = createRenderer({
  nodeOps: {
    createElement() {   },
    createText() {   }
    // more...
  },
  patchData
})
自定义渲染
自定义渲染器让 Vue 脱离了浏览器的限制,只需要实现平台内部的增删改查函数后,就可以直接对接 Vue 3。比方说可以把 Vue 渲染到小程序平台,实现 Vue 3-minipp;也可以渲染到 Canvas,实现 vue 3-canvas,把虚拟 dom 渲染成 Canvas;甚至还可以尝试把 Vue 3 渲染到 threee.js 中,在 3D 世界使用响应式开发
接下来一起尝试实现一个 Canvas 的渲染器。具体操作是这样的,在项目的 src 目录下新建 renderer.js,通过这个文件实现一个简易的 Canvas 渲染逻辑。Canvas 平台中操作的方式相对简单,没有太多节点的概念,可以把整个 Canvas 维护成一个对象,每次操作的时候直接把 Canvas 重绘一下就可以了
import { createRenderer } from '@vue/runtime-core'

const { createApp: originCa } = createRenderer({
  insert: (child, parent, anchor) => {
  },
  createElement(type, isSVG, isCustom) {
  },
  setElementText(node, text) {
  },
  patchProp(el, key, prev, next) {
  },
});
下面的代码中实现了 draw 函数,这里就是用 Canvas 的操作方法递归地把 Canvas 对象渲染到 Canvas 标签内部
let ctx
function draw(ele, isChild) {
  if (!isChild) {
    ctx.clearRect(0, 0, 500, 500)
  }

  ctx.fillStyle = ele.fill || 'white'
  ctx.fillRect(...ele.pos)
  if (ele.text) {
    ctx.fillStyle = ele.color || 'white'
    ele.fontSize = ele.type == "h1" ? 20 : 12
    ctx.font = (ele.fontSize || 18) + 'px serif'
    ctx.fillText(ele.text, ele.pos[0] + 10, ele.pos[1] + ele.fontSize)
  }
  ele.child && ele.child.forEach(c => {
    console.log('child:::', c)
    draw(c, true)
  })
}
由于主体需要维护的逻辑就是对于对象的操作,所以创建和更新操作直接操作对象即可。新增 insert 需要维护 parent 和 child 元素。另外,插入的时候也需要调用 draw 函数,并且需要监听 onclick 事件
const { createApp: originCa } = createRenderer({
  insert: (child, parent, anchor) => {
    if (typeof child == 'string') {
      parent.text = child
    } else {
      child.parent = parent
      if (!parent.child) {
        parent.child = [child]
      } else {
        parent.child.push(child)
      }
    }
    if (parent.nodeName) {
      draw(child)
      if (child.onClick) {
        ctx.canvas.addEventListener('click', () => {
          child.onClick()
          setTimeout(() => {
            draw(child)
          })
        }, false)
      }
    }
  },
  createElement(type, isSVG, isCustom) {
    return {
      type
    }
  },
  setElementText(node, text) {
    node.text = text
  },
  patchProp(el, key, prev, next) {
    el[key] = next
  },

});
现在来到 src/main.js 中,这时候就不能直接从 vue 中引入 createApp 了,而是需要从 runtime-core 中导入 createRenderer
接下来通过 createRenderer 用自已定义的 renderer 去创建 createApp,并且重写 mount 函数。在 Canvas 的 mount 中需要创建 Canvas 标签并且挂载到 App 上
import { createRenderer } from '@vue/runtime-core'
const { createApp: originCa } = createRenderer({

})
function createApp(...args) {
  const app = originCa(...args)
  return {
    mount(selector) {
      const canvas = document.createElement('canvas')
      canvas.width = window.innerWidth
      canvas.height = window.innerHeight
      document.querySelector(selector).appendChild(canvas)
      ctx = canvas.getContext('2d')
      app.mount(canvas)
    }
  }
}
下一步进入 src/App.vue 中,就可以在 Vue 组件中使用 ref 等响应式的写法。实现了通过 ref 返回的响应式对象,渲染 Canvas 内部的文字和高度,并且点击的时候还可以修改文字。完成上面的操作就实现了 Canvas 平台的基本渲染
<template>
  <div @click="setName('vue3真棒')" :pos="[10,10,300,300]" fill="#eee">
    <h1 :pos="[20,20,200,100]" fill="red" color="#000">累加器{{count}}</h1>
    <span :pos="pos" fill="black" >哈喽{{name}}</span>
  </div>
</template>

<script setup>

  import {ref} from 'vue'
  const name = ref('vue3入门')
  const pos = ref([20,120,200,100])
  const count = ref(1)
  const setName = (n)=>{
    name.value = n
    pos.value[1]+=20
    count.value+=2
  }
</script>
上面的代码在浏览器里就会有下图的显示效果。我们点击 Canvas 后,文案就会显示为“哈喽 vue3 真棒”,并且黑色方块和红色方块的距离也会变大。
基于这个原理其实可以做很多有意思的尝试,社区也也有越来越多开源的 Vue 3 的自定义渲染器,比如小程序跨端框架 uni-app,Vugel 可以使用 Vue 渲染 Webgl 等,你也可以动手多多体验
比如下面的代码中对 three.js 进行一个渲染的尝试。它的实现逻辑和 Canvas 比较类似,通过对于对象的维护和 draw 函数实现最终的绘制。在 draw 函数内部调用 three.js 的操作方法去创建 camera、sence、geometry 等概念,最后对外暴露 three.js 的 createApp 函数
import { createRenderer } from '@vue/runtime-core'
import * as THREE from 'three'
import {nextTick} from '@vue/runtime-core'

let renderer

function draw(obj) {
  const {camera,cameraPos, scene, geometry,geometryArg,material,mesh,meshY,meshX} = obj
  if([camera,cameraPos, scene, geometry,geometryArg,material,mesh,meshY,meshX].filter(v=>v).length<9){
    return
  }
  let cameraObj = new THREE[camera]( 40, window.innerWidth / window.innerHeight, 0.1, 10 )
  Object.assign(cameraObj.position,cameraPos)

  let sceneObj = new THREE[scene]()

  let geometryObj = new THREE[geometry]( ...geometryArg)
  let materialObj = new THREE[material]()

  let meshObj = new THREE[mesh]( geometryObj, materialObj )
  meshObj.rotation.x = meshX
  meshObj.rotation.y = meshY
  sceneObj.add( meshObj )
  renderer.render( sceneObj, cameraObj );

}

const { createApp: originCa } = createRenderer({
  insert: (child, parent, anchor) => {
    if(parent.domElement){
      draw(child)
    }
  },
  createElement(type, isSVG, isCustom) {
    return {
      type
    }
  },
  setElementText(node, text) {
  },
  patchProp(el, key, prev, next) {
    el[key] = next
    draw(el)
  },
  parentNode: node => node,
  nextSibling: node => node,
  createText: text => text,
  remove:node=>node

});
function createApp(...args) {
  const app = originCa(...args)
  return {
    mount(selector) {
      renderer = new THREE.WebGLRenderer( { antialias: true } );
      renderer.setSize( window.innerWidth, window.innerHeight );
      document.body.appendChild( renderer.domElement );
      app.mount(renderer)
    }
  }
}
export { createApp }
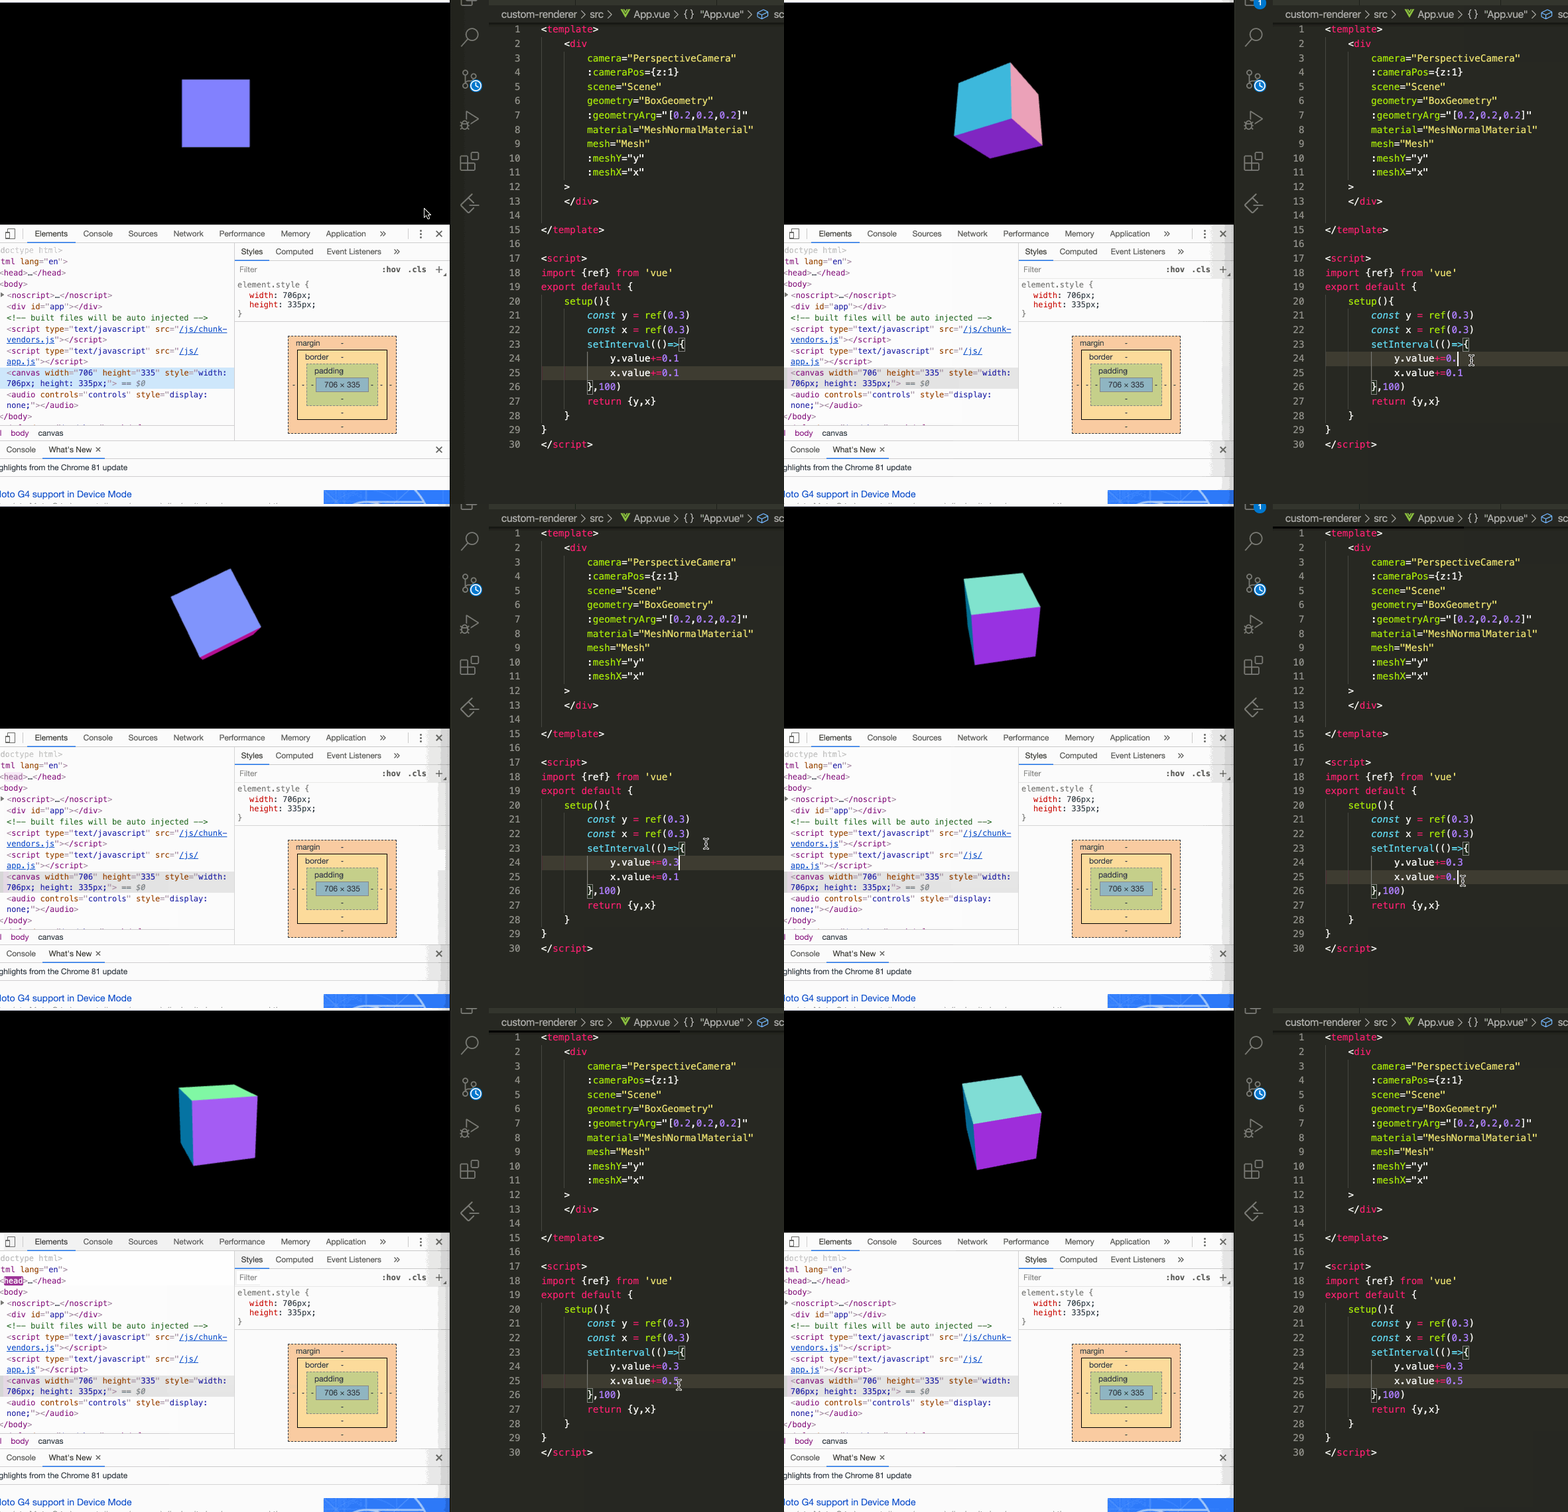
然后在 App.vue 中,使用下面的代码渲染出一个立方体,并且通过 ref 响应式对象控制立方体偏移的监督,再通过 setInterval 实现立方体的动画,实现下图的反转效果
<template>
  <div
    camera="PerspectiveCamera"
    :cameraPos={z:1}
    scene="Scene"
    geometry="BoxGeometry"
    :geometryArg="[0.2,0.2,0.2]"
    material="MeshNormalMaterial"
    mesh="Mesh"
    :meshY="y"
    :meshX="x"
    >
  </div>
</template>

<script>
  import {ref} from 'vue'
  export default {
    setup(){
      const y = ref(0.3)
      const x = ref(0.3)
      setInterval(()=>{
        y.value+=0.3
        x.value+=0.5
      },100)
      return {y,x}
    }
  }
</script>
反转效果演示如下:
还可以在 Canvas 的封装上更进一步,并且实现对一些 Canvas 已有框架 Pixi.js 的封装,这样就可以通过 Vue 3 的响应式的开发方式,快速开发一个小游戏。
import {Graphics} from "PIXI.js";

export const getNodeOps = (app) => {
  return {
    insert: (child, parent, anchor) => {
      parent.addChild(child);
    },

    remove: (child) => {
      const parent = child.parentNode;
      if (parent) {
        parent.removeChild(child);
      }
    },

    createElement: (tag, isSVG, is) => {
      let element;
      if (tag === "Rectangle") {
        // 创建一个矩形
        element = new window.PIXI.Graphics();
        element.lineStyle(4, 0xff3300, 1);
        element.beginFill(0x66ccff);
        element.drawRect(0, 0, 64, 64);
        element.endFill();
        element.x = 0;
        element.y = 0;
        // Opt-in to interactivity
        element.interactive = true;

        // Shows hand cursor
        element.buttonMode = true;
      } else if (tag === "Sprite") {
        element = new window.PIXI.Sprite();
        element.x = 0;
        element.y = 0;
      } else if (tag === "Container") {
        element = new window.PIXI.Container();
        element.x = 0;
        element.y = 0;
      }

      return element;
    },

    createText: (text) => doc.createTextNode(text),

    createComment: (text) => {
      //   console.log(text);
    },

    setText: (node, text) => {
      node.nodeValue = text;
    },

    setElementText: (el, text) => {
      el.textContent = text;
    },

    parentNode: (node) => node.parentNode,

    nextSibling: (node) => node.nextSibling,

    querySelector: (selector) => doc.querySelector(selector),

    setScopeId(el, id) {
      el.setAttribute(id, "");
    },

    cloneNode(el) {
      return el.cloneNode(true);
    },
  };
};
Pixi 中的属性修改可以使用下面的代码,判断 x、y、width 和 on 属性不同的操作,就是用响应式包裹了 Pixi 的对象。关于 Vue 3 和 Pixi 实现的代码效果,你可以在 GitHub 看到全部的源码
export const patchProp = (
  el,
  key,
  prevValue,
  nextValue,
  isSVG = false,
) => {
  switch (key) {
    case "x":
    case "y":
    case "width":
    case "height":
      el[key] = nextValue;
      break;
    case "on":
      Object.keys(nextValue).forEach((eventName) => {
        const callback = nextValue[eventName];
        el.on(eventName, callback);
      });
      break;
    case "texture":
      let texture = PIXI.Texture.from(nextValue);
      el.texture = texture;
      break;
  }
};